Create Your First Social Media Site with Flask


Jennifer Jay
Digital Engineering Fellowship, Spring 2022
University of Calgary
Contact Me
GitHub: Jennifer-Jay
End Goal Preview
In this blog, you will learn how to develop and deploy a social networking site with Flask server.
Features of the website:
- Sign-up page to allow users to create an account
- Log-in page to allow users to sign-in.
- Users can create blog like posts.
- Feed page where users can view made by themselves or other users.
- Users can update their account information including username, profile picture, email.
- Unique URL that anyone on the internet can access.
- This application works on computers, tablets, or phones.
Here is a preview of the site:
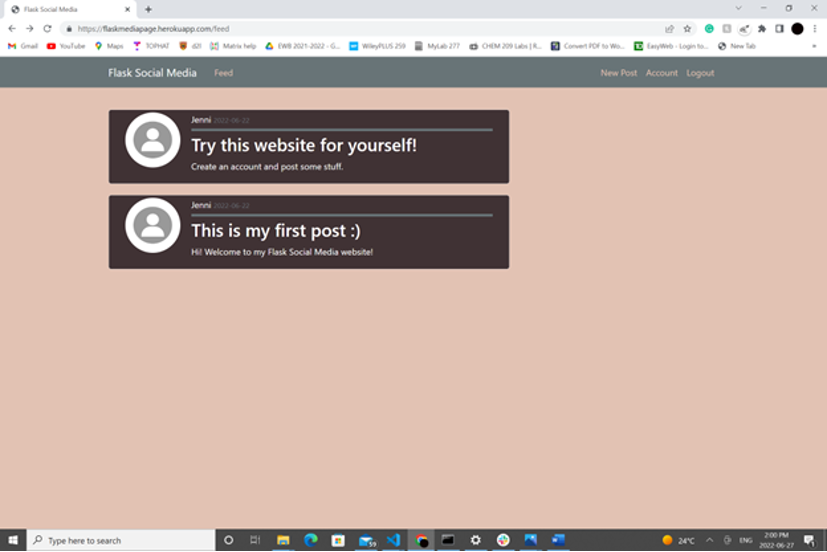


Here is the link to the Flask website we will be creating if you would like to take a look.
Principles for Educators
2. Make the game worth playing
Nowadays, the majority of students spend hours a day on social media. It is an extremely valuable communication tool that many rely on to spread information and the opportunity to connect with people worldwide. This blog will teach you how you can create and deploy your own website that will allow anyone on the world wide web to share posts - no matter their location.
Structuring Your Packages with Flask Blueprint
To minimize potential errors in your code and avoid long hours of fustration, it is important that programmers understand how to effectively organize their files in their directory. Flask Blueprint allows users to organize their application into small packages.
This is how we will be organizing our code:
- Create a new folder on your computer. Lets name it
FlaskWebPage. Open this folder in a code editor such as Visual Studio Code. - Within your directory, create a folder named
webpage. - Within this folder, make a file named
__ init__.pyand another namedmodels.py. - Within your
webpagefolder, create a folder namedtemplates. This will be where we store the files that contain the HTML elements that describes the content and layout for each of our pages. - Create another folder within the
webpagefolder and name itstatic. This is where we will be storing user's profile pictures and our CSS file which will allow us to customize and style our website. This type of file is considered static because they do not change while our program is running. - Make three more folders in the
webpagefolder named,users(a module containing code to create, update, and validate the user's account),posts(a module containing code to allow users to create posts), andmain(a module containing code to display the posts on the feed page of our website). - Within each the
users,posts, andmainfiles, make__ init__.pyandroutes.pyfiles.__ init__.pyfile lets the application know that the file it is contained in is a module.routes.pyfile creates the different URLs for the different functions and pages on the website.
This is how your files should be structures.
├── webpage
│   ├── static
│   ├── templates
│   ├── main
│   │   ├── __init__.py
│   │   ├── routes.py
│   ├── posts
│   │   ├── __init__.py
│   │   ├── routes.py
│   ├── users
│   │   ├── __init__.py
│   │   ├── routes.py
│   ├── __init__.py
│   ├── models.py
Implementing Blueprint
Within each module, we need to create a Blueprint instance.
In the main __ init__.py file, create a Blueprint instance with the following code:
from flask import Blueprint

main = Blueprint('main', __name__)
Similarly, for the posts and users __ init__.py files, use the same code to create Blueprint instances, however, replace "main" with the module name.
Within posts __ init__.py file:
from flask import Blueprint

posts = Blueprint('posts', __name__)
Within users __ init__.py file:
from flask import Blueprint

user = Blueprint('user', __name__)
Open the webage __ init__.py</code></i> file. We will be importing the blueprint instances we created from each module, then registering them with the following code:</h4>
from flask import Flask
app = Flask(__name__)
from webpage.users.routes import users
from webpage.posts.routes import posts
from webpage.main.routes import main
app.register_blueprint(users)
app.register_blueprint(posts)
app.register_blueprint(main)
app = Flask(__ name__) is used in every Flask app in order to inherit the attributes and methods from the Flask class.
</div>
</div>
</div>
Virtual Environment
It is important that we are programming in a virtual environment to avoid instally Python packages globally. This will save us some time and make deploying our flask application easier.
Steps:
- Ensure the virtual environment package is installed on VSCode by typing in the terminal “pip install virtualenv”.
- Create your virtual environment by typing “virtualenv env”
- Activate your virtual environment with “env\Scripts\activate.bat” or for a MacBook “source env/bin/activate”.
Ensure your virtual environment is activate when you install packages. This will be beneficial when creating your requirements.txt</code></i> file when we cover Deploying your Website.</p>
</blockquote>
</li>
</ol>
Here is a list of packages you will need to install:```BareNecessities==0.2.8
bcrypt==3.2.2
blinker==1.4
cffi==1.15.0
click==8.1.3
colorama==0.4.5
dnspython==2.2.1
email-validator==1.2.1
Flask==2.1.2
Flask-Bcrypt==1.0.1
Flask-Login==0.6.1
Flask-Mail==0.9.1
Flask-SQLAlchemy==2.5.1
Flask-WTF==1.0.1
greenlet==1.1.2
gunicorn==20.1.0
idna==3.3
importlib-metadata==4.11.4
itsdangerous==2.1.2
Jinja2==3.1.2
Mail==2.1.0
MarkupSafe==2.1.1
Pillow==9.1.1
psycopg2==2.9.3
pycparser==2.21
SQLAlchemy==1.4.37
Werkzeug==2.1.2
WTForms==3.0.1
zipp==3.8.0
```
</div>
</div>
</div>
Templates (HTML)
Templates allow you to create the content and layout of the different pages of your website with its own HTML file. In this section, you will learn how to create a parent and child template. Throughout the blog, you will need to make a unique child template for every page on your website.
Within your templates folder, create three files: a file named layout.html, and a file named feed.html.
├── webpage
│ ├── static
│ ├── templates
│ │ ├── feed.html
│ │ ├── layout.html
│ ├── main
│ │ ├── __init__.py
│ │ ├── routes.py
│ ├── posts
│ │ ├── __init__.py
│ │ ├── routes.py
│ ├── users
│ │ ├── __init__.py
│ │ ├── routes.py
│ ├── __init__.py
│ ├── models.py
Parent Template
The layout.html file will be the parent template, providing a base containing the common elements of our website. The other templates (child templates) will inherit these common elements.
This is the code we will be working with in our layout.html file:
<!DOCTYPE html>
<html>
<head>
<!-- Required meta tags -->
<meta charset="utf-8">
<meta name="viewport" content="width=device-width, initial-scale=1, shrink-to-fit=no">
<!-- Bootstrap CSS -->
<link rel="stylesheet" href="https://maxcdn.bootstrapcdn.com/bootstrap/4.0.0/css/bootstrap.min.css" integrity="sha384-Gn5384xqQ1aoWXA+058RXPxPg6fy4IWvTNh0E263XmFcJlSAwiGgFAW/dAiS6JXm" crossorigin="anonymous">
<link rel="stylesheet" type="text/css" href="{{ url_for('static', filename='main.css') }}">
{% if title %}
<title>Flask Scoial Media- {{ title }}</title>
{% else %}
<title>Flask Social Media</title>
{% endif %}
</head>
<body>
<header class="site-header">
<nav class="navbar navbar-expand-md navbar-dark bg-steel fixed-top">
<div class="container">
<a class="navbar-brand mr-4" href="/">Flask Social Media</a>
<button class="navbar-toggler" type="button" data-toggle="collapse" data-target="#navbarToggle" aria-controls="navbarToggle" aria-expanded="false" aria-label="Toggle navigation">
<span class="navbar-toggler-icon"></span>
</button>
<div class="collapse navbar-collapse" id="navbarToggle">
<div class="navbar-nav mr-auto">
<a class="nav-item nav-link" href="{{ url_for('main.feed') }}">Feed</a>
</div>
<!-- Navbar Right Side -->
<div class="navbar-nav">
{% if current_user.is_authenticated %}
<a class="nav-item nav-link" href="{{ url_for('posts.new_post') }}">New Post</a>
<a class="nav-item nav-link" href="{{ url_for('users.account') }}">Account</a>
<a class="nav-item nav-link" href="{{ url_for('users.logout') }}">Logout</a>
{% else %}
<a class="nav-item nav-link" href="{{ url_for('users.login') }}">Login</a>
<a class="nav-item nav-link" href="{{ url_for('users.register') }}">Register</a>
{% endif %}
</div>
</div>
</div>
</nav>
</header>
<main role="main" class="container">
<div class="row">
<div class="col-md-8">
{% with messages = get_flashed_messages(with_categories=true) %}
{% if messages %}
{% for category, message in messages %}
<div class="alert alert-{{ category }}">
{{ message }}
</div>
{% endfor %}
{% endif %}
{% endwith %}
{% block content %}{% endblock %}
</div>
</div>
</main>
<!-- Optional JavaScript -->
<!-- jQuery first, then Popper.js, then Bootstrap JS -->
<script src="https://code.jquery.com/jquery-3.2.1.slim.min.js" integrity="sha384-KJ3o2DKtIkvYIK3UENzmM7KCkRr/rE9/Qpg6aAZGJwFDMVNA/GpGFF93hXpG5KkN" crossorigin="anonymous"></script>
<script src="https://cdnjs.cloudflare.com/ajax/libs/popper.js/1.12.9/umd/popper.min.js" integrity="sha384-ApNbgh9B+Y1QKtv3Rn7W3mgPxhU9K/ScQsAP7hUibX39j7fakFPskvXusvfa0b4Q" crossorigin="anonymous"></script>
<script src="https://maxcdn.bootstrapcdn.com/bootstrap/4.0.0/js/bootstrap.min.js" integrity="sha384-JZR6Spejh4U02d8jOt6vLEHfe/JQGiRRSQQxSfFWpi1MquVdAyjUar5+76PVCmYl" crossorigin="anonymous"></script>
</body>
</html>
Using Bootstrap for your templates, can make designing your web page quicker and easier. I used their Starter Template from their official website: Bootstrap website.
To link the CSS file that we will be creating in the Design Your Website (CSS) section, use link rel="stylesheet" type="text/css" href="" to indicate that the location of our stylesheet will be in the static folder in the file main.css which we will be creating later on in blog.
div class=”alert alert-” will allow us to send out alerts to the user on our webpage every time the user successfully fills out a form such as signing up, logging in, creating posts, or updating their account. In our layout.html , we have to use get_flashed_messages() to return the category. Here is an example of an alert:
nav class=”navbar navbar-expand-md navbar-dark bg-steel fixed-top” creates a navigation bar at the top of our webpage. We can display the title of our site using class="navbar-brand mr-3" href="/">Flask Social Media.
On the left side of the navigation bar, we can add links to the home and about page by using div class=”navbar-nav mr-auto”.
On the right side of the navigation bar, we can add links to the login and register page by using div class=”navbar-nav”.
{% block content %}{% endblock %} is used for overriding specific parts of the layout.html template that will need to be unique to certain pages. This will need to be incorporated in every child template you create to ensure your website shows the relevant information for each page.
Child Template
First lets create our template for our feed page. This will be where users can scroll and read posts made by themselves and other users.
In your feed.html file, copy the following code:
{% extends "layout.html" %}
{% block content %}
{% for post in posts %}
<article class="media content-section">
<img class="rounded-circle article-img" src="{{ url_for('static', filename='profile_pics/' + post.author.image_file) }}">
<div class="media-body">
<div class="article-metadata">
<a> {{ post.author.username }}</a>
<small class="text-muted">{{ post.date_posted.strftime('%Y-%m-%d') }}</small>
</div>
<h2><a>{{ post.title }}</a></h2>
<p class="article-content">{{ post.content }}</p>
</div>
</article>
{% endfor %}
{% endblock content %}
In order to inherit from our parent template, use {% extends "layout.html" %}.
Like I mentioned in the Parent Template section, we will use {% block content %}{% endblock content %} to create the specific content on each page.
On our feed page, we will be displaying the posts. The code block {% for post in posts %} will retrieve information from a post object containing information about the author, the date the post was posted, the title, and the content that we will be covering later on in in the Databases (SQLAlchemy) section.
We can use Bootstrap to customize the shape of the user's profile picture that will be displayed on the posts using "rounded-circle article-img". url_for('static', filename='profile_pics/' + post.author.image_file) tells the program where to look to obtain the profile pictures. In this case, the user's profile pictures will be under the static</code></i> folder, in a file named profile_pics</code></i> which we will be creating in the Default Profile Picture section.</h4>
url_for</code></i> is a really useful function that helps determine the exact location to route to. We will be seeing more of this throughout the blog.</h4>
Secret Key
When using forms, it is ideal that we create a “secret key” to prevent hijacking of the web application. This is used to sign session cookies and protect against cookie data tampering. It is necessary to avoid sharing this key to keep your Flask application secure.
Update the webpage __ init.py file with the following code:
from flask import Flask
from flask_sqlalchemy import SQLAlchemy
app = Flask(__name__)
app.config['SECRET_KEY'] = '5791628bb0b13ce0c676dfde280ba245'
from webpage.users.routes import users
from webpage.posts.routes import posts
from webpage.main.routes import main
app.register_blueprint(users)
app.register_blueprint(posts)
app.register_blueprint(main)
Use app.config['SECRET_KEY'] to implement your key. Your key can be anything you wish, however, it is important that your key is hard to guess. I would recommend using a random string generator to generate a long random string.
</div>
</div>
</div>
Designing your Web Page (CSS)
To add custom style and format your HTML templates, you will need to create a Cascading Style Sheets (CSS). CSS is a style language considered static because there is no interaction with the code.
In your static folder, create a file named main.css</code></i>.</h4>
├── webpage
│ ├── static
│ │ ├── main.css
│ ├── templates
│ │ ├── feed.html
│ │ ├── layout.html
│ ├── main
│ │ ├── __init__.py
│ │ ├── routes.py
│ ├── posts
│ │ ├── __init__.py
│ │ ├── routes.py
│ ├── users
│ │ ├── __init__.py
│ │ ├── routes.py
│ ├── __init__.py
│ ├── models.py
CSS is a relatively straight forward language.
This is the code I used to design the webpage shown in this blog. Feel free to adjust the CSS code in the main.css</code></i> file to personalize the theme of your website to your liking.</h4>
body {
background: #E2C2B3;
color: #fff;
margin-top: 6rem;
}
h1, h2, h3, h4, h5, h6 {
color: #ffff;
}
.bg-steel {
background-color: #687477;
}
.site-header .navbar-nav .nav-link {
color: #E2C2B3;
}
.site-header .navbar-nav .nav-link.active {
font-weight: 100;
}
.content-section {
padding: 4px 30px;
background: #403234;
border: 1px solid #dddddd;
border-radius: 5px;
margin-bottom: 20px;
}
.article-title {
color: #ffff;
}
.article-content {
white-space: pre-line;
}
.article-img {
height: 100px;
width: 100px;
margin-right: 20px;
}
.article-metadata {
padding-bottom: 5px;
margin-bottom: 5px;
border-bottom: 5px solid #687477
}
.article-svg {
width: 25px;
height: 25px;
vertical-align: middle;
}
.account-img {
height: 125px;
width: 125px;
margin-right: 20px;
margin-bottom: 16px;
}
.account-heading {
font-size: 2rem;
}
Common CSS Properties
Description
background
Pick the background color or image, position, size, repeat (how the images are repeated), origin, clip (painting area), attachment (whether images are fixed or scrolls), initial (sets to default value), or whether to inherit from parent template
color
Specify the text color
font
Pick your desired font style, variant, weight, size and font-family
padding
Specify how much space is needed on top, bottom, left, or right side of elements.
border
Pick the type of border: dotted, dashed, solid, double, groove, ridge, inset, outset, no border, hidden border, mixed border.
margin
Set different margins on the top, bottom, right, and left side
text-decoration
Choose decorations like underline, overline, line-through, underline overline, as well as the color, style and thickness.
</div>
</div>
</div>
Databases(SQLAlchemy)
SQLAlchemy allows programmers to easily convert data stored in a database into objects. We will be using this database to store information about the user and create a one-to-many relationship between the user's account such as their username, email, and profile picture, as well as their posts.
First, we need to create a URI for the database to use. For development purposes, we will be using SQLite which is a lightweight, fast open SQL engine - this will have to be replaced when we deploy the website later on. Then we will use the “app” parameter to create a database instance.
Open the webage __ init__.py</code></i> file. Update the code to the following:</h4>
from flask import Flask
from flask_sqlalchemy import SQLAlchemy
app = Flask(__name__)
app.config['SECRET_KEY'] = '5791628bb0b13ce0c676dfde280ba245'
app.config['SQLALCHEMY_DATABASE_URI'] = 'sqlite:///site.db'
db = SQLAlchemy(app)
from webpage.users.routes import users
from webpage.posts.routes import posts
from webpage.main.routes import main
app.register_blueprint(users)
app.register_blueprint(posts)
app.register_blueprint(main)
Now to create our datbases to save the user's account information and their posts, code the following in the webpage models.py file.
from datetime import datetime
from webpage import db, login_manager
from flask_login import UserMixin
@login_manager.user_loader
def load_user(user_id):
return User.query.get(int(user_id))
class User(db.Model, UserMixin):
id = db.Column(db.Integer, primary_key=True)
username = db.Column(db.String(20), unique=True, nullable=False)
email = db.Column(db.String(120), unique=True, nullable=False)
image_file = db.Column(db.String(130), nullable=False, default='default.jpg')
password = db.Column(db.String(60), nullable=False)
posts = db.relationship('Post', backref='author', lazy=True)
def __repr__(self):
return f"User('{self.username}', '{self.email}', '{self.image_file}')"
class Post(db.Model):
id = db.Column(db.Integer, primary_key=True)
title = db.Column(db.String(100), nullable=False)
date_posted = db.Column(db.DateTime, nullable=False, default=datetime.utcnow)
content = db.Column(db.Text, nullable=False)
user_id = db.Column(db.Integer, db.ForeignKey('user.id'), nullable=False)
def __repr__(self):
return f"Post('{self.title}', '{self.date_posted}')"
In this file, we will be creating two databases. the first one will be the class User(db.Model) which will contain the user information, and the second one will be class Post(db.Model) which will store data about each post. class User(db.Model) will take in the UserMixin parameter which allows the program to incorporate the following properties:
- is_authenticated() returns True if the user has provided valid credentials.
- is_active() returns True if the user’s account is active.
- is_anonymous() returns True if the current user is an anonymous user.
- get_id() given a User instance, returns the unique ID for that object.
To use this login_manager extension, we will have to tell the program how to find one of our users by their id. The <code>@login_manager</code> is a key naming convention that identifies that this is the function specifying how to get a user by their id. load_user, takes the user_id as the parameter and gets the user using user.query.get from the database we will be creating next.
We imported db which will allow us to program the SQLAlchemy database and datetime.
1. The class User(db.Model) is created first.
This object will create a table containing user information. An unique id will be given to our users so we will set primary_key=True.
The username will have db.string(17) because I set the maximum characters for the username to be 17. We also want each username to be unique, hence, unique=True. Each user is required to have a username so nullable=False.
The user’s profile image will be limited to 22 characters. A default image will be provided to those without profile images, therefore nullable=False.
To link the user with their own posts, we will need to use db.relationship to associate with our Post model which we will make in the next step. The function backref=’author’ allows us to retrieve the user of the post. lazy loading allows us to retrieve every post from a single user.
def __repr__(self): represents the string from our User object in a printable representation. This will come in handy when displaying the posts to the feed page.
2. Then we create class Post(db.Model).
Each post will need a title, therefore nullable=False. The title is also limited to 150 characters.
The posts will also show the time posted using db.DateTime which we imported earlier. The function datetime.utcnow will allow our program to determine the current time the post was posted.
The content will have the text and does not have to be unique.
We need our database to correlate the user.id to their post. The function db.ForeignKey allows the program to reference information from the user_id column (child table) to the Post column (parent table).
The printable representation of our post will show the title and the date posted.
Lastly, we need to create the database.
- In your terminal, first type “python”.
- Then type “from flaskblog import db”.
- Finally type “db.create_all()”.
Since we are using SQLite, a site.db file will be created in our directory.
├── webpage
│ ├── static
│ │ ├── main.css
│ ├── templates
│ │ ├── feed.html
│ │ ├── layout.html
│ ├── main
│ │ ├── __init__.py
│ │ ├── routes.py
│ ├── posts
│ │ ├── __init__.py
│ │ ├── routes.py
│ ├── users
│ │ ├── __init__.py
│ │ ├── routes.py
│ ├── __init__.py
│ ├── models.py
│ ├── site.db
Now we have a database!
</div>
</div>
</div>
Sign-up and Log-in
Every file related to creating, updating or validating a user's account will be found in the users module. Currently we have a __ init__.py and a routes.py file within users. We will also need to add a users forms.py file.
├── webpage
│ ├── static
│ │ ├── main.css
│ ├── templates
│ │ ├── feed.html
│ │ ├── layout.html
│ ├── main
│ │ ├── __init__.py
│ │ ├── routes.py
│ ├── posts
│ │ ├── __init__.py
│ │ ├── routes.py
│ ├── users
│ │ ├── __init__.py
│ │ ├── forms.py
│ │ ├── routes.py
│ ├── __init__.py
│ ├── models.py
│ ├── site.db
WTForms
Within users forms.py file, we will use a function called WTForms - a handy Flask extension that allows programmers to easily validate forms and deploy security features. Perfect for sign-up and log-in pages!
from flask_wtf import FlaskForm
from flask_wtf.file import FileField, FileAllowed
from wtforms import StringField, PasswordField, SubmitField, BooleanField
from wtforms.validators import DataRequired, Length, Email, EqualTo, ValidationError
from webpage.models import User
class RegistrationForm(FlaskForm):
username = StringField('Username',
validators=[DataRequired(), Length(min=5, max=17)])
email = StringField('Email',
validators=[DataRequired(), Email()])
password = PasswordField('Password', validators=[DataRequired()])
confirm_password = PasswordField('Confirm Password',
validators=[DataRequired(), EqualTo('password')])
submit = SubmitField('Sign Up')
def validate_username(self, username):
user = User.query.filter_by(username=username.data).first()
if user:
raise ValidationError('That username is taken. Please choose a different one.')
def validate_email(self, email):
user = User.query.filter_by(email=email.data).first()
if user:
raise ValidationError('That email is taken. Please choose a different one.')
class LoginForm(FlaskForm):
email = StringField('Email',
validators=[DataRequired(), Email()])
password = PasswordField('Password', validators=[DataRequired()])
remember = BooleanField('Remember Me')
submit = SubmitField('Login')
class UpdateAccountForm(FlaskForm):
username = StringField('Username',
validators=[DataRequired(), Length(min=5, max=17)])
email = StringField('Email',
validators=[DataRequired(), Email()])
picture = FileField('Update Profile Picture', validators=[FileAllowed(['jpg', 'png'])])
submit = SubmitField('Update')
The RegistrationForm Class will take in the necessary information from the user to create an account.
We will be using validators to create certain requirements for the user’s account. For example, validators=[DataRequired(), Length(min=5, max=17)] ensures usernames have a minimum of 5 characters and a maximum of 17.
We can also validate their email to ensure it is legitimate with Email(). We use the EqualTo validator for the password to ensure the password and the password confirmation are the same.
The user can then click 'Sign Up' on the website to submit their form. 'Sign Up' will be displayed as a button, which we will create using Bootstrap in our template register.html</code></i> we will be creating later on in this section.</h4>
The def validate_username</code></i> and def validate_email</code></i> ensures that there are no duplicates within the database. User.query.filter_by</code></i> is a helpful function that filters through the application's database to look for the relevant information. If user</code></i> returns True, a ValidationError message will occur.</h4>
Similarly, we will create the LoginForm Class. Here we will be asking the user for their email and password to log-in. A remember field can be incorporated by using BooleanField which allows the user to pick between “true” or “false”. Then the user submits the form by pressing 'Login'.
Finally, the UpdateAccountForm Class will take in a username and email with the same requirements from the RegistrationForm Class. This form will also allow users to update their profile picture only as a .jpg or .png file.
Routing
users routes.py</code></i> will be used to route to different pages using the .route function. This function allows you to create a unique URL for each page. For example, we made the path to the sign up page “/register”. The URL 127.0.0.1:5000/about will route us here. We will be using render_template to allow the program to generate output from our HTML template files we created.</h3>
from flask import render_template, url_for, flash, redirect, request, Blueprint
from flask_login import login_user, current_user, logout_user, login_required
from webpage import db, bcrypt
from webpage.models import User
from webpage.users.forms import (RegistrationForm, LoginForm, UpdateAccountForm)
from webpage.users.save_pics import save_picture
users = Blueprint('users', __name__)
@users.route("/register", methods=['GET', 'POST'])
def register():
if current_user.is_authenticated:
return redirect(url_for('main.feed'))
form = RegistrationForm()
if form.validate_on_submit():
hashed_password = bcrypt.generate_password_hash(form.password.data).decode('utf-8')
user = User(username=form.username.data, email=form.email.data, password=hashed_password)
db.session.add(user)
db.session.commit()
flash('Your account has been created!', 'success')
return redirect(url_for('users.login'))
return render_template('register.html', title='Register', form=form)
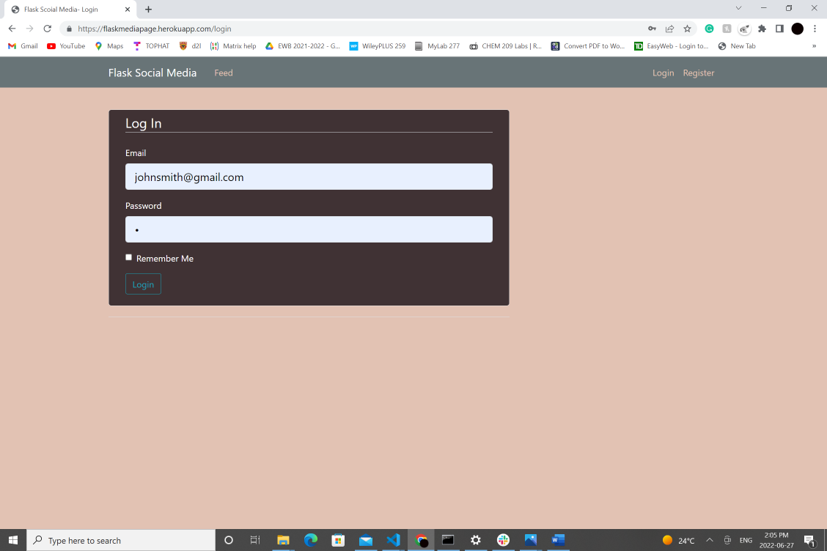
@users.route("/login", methods=['GET', 'POST'])
def login():
if current_user.is_authenticated:
return redirect(url_for('main.feed'))
form = LoginForm()
if form.validate_on_submit():
user = User.query.filter_by(email=form.email.data).first()
if user and bcrypt.check_password_hash(user.password, form.password.data):
login_user(user, remember=form.remember.data)
next_page = request.args.get('next')
return redirect(next_page) if next_page else redirect(url_for('main.feed'))
else:
flash('Login Unsuccessful.', 'danger')
return render_template('login.html', title='Login', form=form)
@users.route("/logout")
def logout():
logout_user()
return redirect(url_for('main.feed'))
@users.route("/account", methods=['GET', 'POST'])
@login_required
def account():
form = UpdateAccountForm()
if form.validate_on_submit():
if form.picture.data:
picture_file = save_picture(form.picture.data)
current_user.image_file = picture_file
current_user.username = form.username.data
current_user.email = form.email.data
db.session.commit()
flash('Account updated!', 'success')
return redirect(url_for('users.account'))
elif request.method == 'GET':
form.username.data = current_user.username
form.email.data = current_user.email
image_file = url_for('static', filename='profile_pics/' + current_user.image_file)
return render_template('account.html', title='Account',
image_file=image_file, form=form)
The ‘GET’ and ‘POST’ requests are required to retrieve and send the user’s information from and to our web server.
form.validate_on_submit will indicate if the form is accepted by all the validator fields when submitted to determine where the webpage should reroute to. url_for will determine the exact location of the route.
flash allows us to generate message alerts using Bootstrap. This is used to inform the user if they have successfully logged in or if their login was unsuccessful.
When registering, a user is redirected to the feed page. The function to route to the feed page will be in the main</code></i> folder hence 'main.feed'. The routes.py</code></i> file will also require access to the forms we previously created in the forms.py</code></i>. if form.validate_on_submit() will check if the form is valid, then will start hashing using Bcrypt the password that the user inputed before saving it in the database. A flash message informing the user that their account has been created appears, then they are redirected to the login page.</h4>
Hashing is irreversible; unlike encryption and encoding, there is no way to de-hash a password. It is good practice to hash sensitive information like passwords incase of potential data leaks. The user's information and hashed password is added to the database - the actual password is never stored!
The login page will check whether the information that the user inputs on the form matched the database. user = User.query.filter_by(email=form.email.data).first() checks the email that the user inputs with the database to see if it exists. Then if user is true (email matches with the database), the program checks the password that the user inputted with the password that was remembered by the program (this password is the unhashed password that is not saved in the database, only remembered). If successful, user will be redirected to their feed, else, a flash message will appear.
flask_login provides an easy to use logout_user function.
To update your account, flask_login ensures that the user is logged in using <code>@login_required</code>. Using the UpdateAccountForm() we created in the forms.py</code></i> file will be used here to replace the original data with the newly inputted data. The account data will be immediately updatted in the account page.</h4>
To use Bcrypt and flask_login we will need to create instances with these functions in the webpage __ init__.py</code>, similar to how we created instances for SQLAlchemy.</h3>
Update the code in webpage __ init__.py</code> with the following:</h4>
from flask import Flask
from flask_sqlalchemy import SQLAlchemy
from flask_bcrypt import Bcrypt
from flask_login import LoginManager
app = Flask(__name__)
app.config['SECRET_KEY'] = '5791628bb0b13ce0c676dfde280ba245'
app.config['SQLALCHEMY_DATABASE_URI'] = 'sqlite:///site.db'
db = SQLAlchemy(app)
bcrypt = Bcrypt(app)
login_manager = LoginManager(app)
from webpage.users.routes import users
from webpage.posts.routes import posts
from webpage.main.routes import main
app.register_blueprint(users)
app.register_blueprint(posts)
app.register_blueprint(main)
Saving Profile Pictures
We will also need another file in our users</code></i> file in order to save the profile pictures. Create a save_pics.py</code></i> file.</h3>
├── webpage
│ ├── static
│ │ ├── main.css
│ ├── templates
│ │ ├── feed.html
│ │ ├── layout.html
│ ├── main
│ │ ├── __init__.py
│ │ ├── routes.py
│ ├── posts
│ │ ├── __init__.py
│ │ ├── routes.py
│ ├── users
│ │ ├── __init__.py
│ │ ├── forms.py
│ │ ├── routes.py
│ │ ├── save_pics.py
│ ├── __init__.py
│ ├── models.py
│ ├── site.db
Import the following code:
import os
import secrets
from PIL import Image
from webpage import app
def save_picture(form_picture):
random_hex = secrets.token_hex(10)
_, f_ext = os.path.splitext(form_picture.filename)
picture_fn = random_hex + f_ext
picture_path = os.path.join(app.root_path, 'static/profile_pics', picture_fn)
output_size = (130, 130)
i = Image.open(form_picture)
i.thumbnail(output_size)
i.save(picture_path)
return picture_fn
To avoid saving pictures with the same name, we can import secrets and use the secrets.token_hex() function to generate a random hex.
We need to make sure the file extension is the same when it is saved. in order to determine the file extension we can use os and the split.text function. The final picture name that will be stored will be the random hex with the picture extension. This is this saved to the profile_pic file within the static folder.
Before the image is saved, we also need to resize it. Using Image programmers can open and resize the image to a certain size. The program will resize the image to the output_size before saving.
Now we have to create templates for our log-in and register pages.
Within templates</code></i>, create a file named login.html</code></i> and register.html</code></i>.</h4>
├── webpage
│ ├── static
│ │ ├── main.css
│ ├── templates
│ │ ├── feed.html
│ │ ├── layout.html
│ │ ├── login.html
│ │ ├── register.html
│ ├── main
│ │ ├── __init__.py
│ │ ├── routes.py
│ ├── posts
│ │ ├── __init__.py
│ │ ├── routes.py
│ ├── users
│ │ ├── __init__.py
│ │ ├── forms.py
│ │ ├── routes.py
│ │ ├── save_pics.py
│ ├── __init__.py
│ ├── models.py
│ ├── site.db
Copy the following code into register.html</code></i></strong>:</h4>
{% extends "layout.html" %}
{% block content %}
<div class="content-section">
<form method="POST" action="">
{{ form.hidden_tag() }}
<fieldset class="form-group">
<legend class="border-bottom mb-4">Join Today</legend>
<div class="form-group">
{{ form.username.label(class="form-control-label") }}
{% if form.username.errors %}
{{ form.username(class="form-control form-control-lg is-invalid") }}
<div class="invalid-feedback">
{% for error in form.username.errors %}
<span>{{ error }}</span>
{% endfor %}
</div>
{% else %}
{{ form.username(class="form-control form-control-lg") }}
{% endif %}
</div>
<div class="form-group">
{{ form.email.label(class="form-control-label") }}
{% if form.email.errors %}
{{ form.email(class="form-control form-control-lg is-invalid") }}
<div class="invalid-feedback">
{% for error in form.email.errors %}
<span>{{ error }}</span>
{% endfor %}
</div>
{% else %}
{{ form.email(class="form-control form-control-lg") }}
{% endif %}
</div>
<div class="form-group">
{{ form.password.label(class="form-control-label") }}
{% if form.password.errors %}
{{ form.password(class="form-control form-control-lg is-invalid") }}
<div class="invalid-feedback">
{% for error in form.password.errors %}
<span>{{ error }}</span>
{% endfor %}
</div>
{% else %}
{{ form.password(class="form-control form-control-lg") }}
{% endif %}
</div>
<div class="form-group">
{{ form.confirm_password.label(class="form-control-label") }}
{% if form.confirm_password.errors %}
{{ form.confirm_password(class="form-control form-control-lg is-invalid") }}
<div class="invalid-feedback">
{% for error in form.confirm_password.errors %}
<span>{{ error }}</span>
{% endfor %}
</div>
{% else %}
{{ form.confirm_password(class="form-control form-control-lg") }}
{% endif %}
</div>
</fieldset>
<div class="form-group">
{{ form.submit(class="btn btn-outline-info") }}
</div>
</form>
</div>
<div class="border-top pt-3">
</div>
{% endblock content %}
form.hidden _tag() works with the secret key to add protection against CSRF attacks.
We need to create a div class=”form-group”> for each of our variables.
Username, email, and password will use the Bootstrap class form-control-label to create a text box for the user the type in the information.
The submit variable will use btn btn-outline-info to create a button that the user can press to submit the form.
When there is an error in the form, we will need the program to run a conditional. For example, if there is an error in the username, the condition {% if form.username.errors %} will be true. This will result in the error variable from the for loop to print.
Copy the following code into login.html</code></i></strong>:</h4>
{% extends "layout.html" %}
{% block content %}
<div class="content-section">
<form method="POST" action="">
{{ form.hidden_tag() }}
<fieldset class="form-group">
<legend class="border-bottom mb-4">Log In</legend>
<div class="form-group">
{{ form.email.label(class="form-control-label") }}
{% if form.email.errors %}
{{ form.email(class="form-control form-control-lg is-invalid") }}
<div class="invalid-feedback">
{% for error in form.email.errors %}
<span>{{ error }}</span>
{% endfor %}
</div>
{% else %}
{{ form.email(class="form-control form-control-lg") }}
{% endif %}
</div>
<div class="form-group">
{{ form.password.label(class="form-control-label") }}
{% if form.password.errors %}
{{ form.password(class="form-control form-control-lg is-invalid") }}
<div class="invalid-feedback">
{% for error in form.password.errors %}
<span>{{ error }}</span>
{% endfor %}
</div>
{% else %}
{{ form.password(class="form-control form-control-lg") }}
{% endif %}
</div>
<div class="form-check">
{{ form.remember(class="form-check-input") }}
{{ form.remember.label(class="form-check-label") }}
</div>
</fieldset>
<div class="form-group">
{{ form.submit(class="btn btn-outline-info") }}
</div>
</form>
</div>
<div class="border-top pt-3">
</div>
{% endblock content %}
This file uses similar functions to the register.html file with slight variation.
The legend is now “Log in” instead of “Signup”.
We do not need the confirm password form group.
We will need div class=”form-check” for our “Remember Me” function which will allow the user to check a box if they would like to be remembered
Lastly, lets create a template to allow users to easily update their account information.
Within templates</code></i>, create a file named account.html</code></i> and register.html</code></i>.</h4>
├── webpage
│ ├── static
│ │ ├── main.css
│ ├── templates
│ │ ├── account.html
│ │ ├── feed.html
│ │ ├── layout.html
│ │ ├── login.html
│ │ ├── register.html
│ ├── main
│ │ ├── __init__.py
│ │ ├── routes.py
│ ├── posts
│ │ ├── __init__.py
│ │ ├── routes.py
│ ├── users
│ │ ├── __init__.py
│ │ ├── forms.py
│ │ ├── routes.py
│ │ ├── save_pics.py
│ ├── __init__.py
│ ├── models.py
│ ├── site.db
Copy the following code into account.html</code></i></strong>:</h4>
{% extends "layout.html" %}
{% block content %}
<div class="content-section">
<div class="media">
<img class="rounded-circle account-img" src="{{ image_file }}">
<div class="media-body">
<h2 class="account-heading">{{ current_user.username }}</h2>
<p class="text-secondary">{{ current_user.email }}</p>
</div>
</div>
<form method="POST" action="" enctype="multipart/form-data">
{{ form.hidden_tag() }}
<fieldset class="form-group">
<legend class="border-bottom mb-4">Account Info</legend>
<div class="form-group">
{{ form.username.label(class="form-control-label") }}
{% if form.username.errors %}
{{ form.username(class="form-control form-control-lg is-invalid") }}
<div class="invalid-feedback">
{% for error in form.username.errors %}
<span>{{ error }}</span>
{% endfor %}
</div>
{% else %}
{{ form.username(class="form-control form-control-lg") }}
{% endif %}
</div>
<div class="form-group">
{{ form.email.label(class="form-control-label") }}
{% if form.email.errors %}
{{ form.email(class="form-control form-control-lg is-invalid") }}
<div class="invalid-feedback">
{% for error in form.email.errors %}
<span>{{ error }}</span>
{% endfor %}
</div>
{% else %}
{{ form.email(class="form-control form-control-lg") }}
{% endif %}
</div>
<div class="form-group">
{{ form.picture.label() }}
{{ form.picture(class="form-control-file") }}
{% if form.picture.errors %}
{% for error in form.picture.errors %}
<span class="text-danger">{{ error }}</span></br>
{% endfor %}
{% endif %}
</div>
</fieldset>
<div class="form-group">
{{ form.submit(class="btn btn-outline-info") }}
</div>
</form>
</div>
{% endblock content %}
This template uses the same bootstrap functions we have seen in the other templates.
</div>
</div>
</div>
Creating Posts
In this section, we will work on the files within our posts</code></i> module to allow users to create posts on the website. Lets add a forms.py</code></i> to this module.</h3>
├── webpage
│ ├── static
│ │ ├── main.css
│ ├── templates
│ │ ├── account.html
│ │ ├── feed.html
│ │ ├── layout.html
│ │ ├── login.html
│ │ ├── register.html
│ ├── main
│ │ ├── __init__.py
│ │ ├── routes.py
│ ├── posts
│ │ ├── __init__.py
│ │ ├── forms.py
│ │ ├── routes.py
│ ├── users
│ │ ├── __init__.py
│ │ ├── forms.py
│ │ ├── routes.py
│ │ ├── save_pics.py
│ ├── __init__.py
│ ├── models.py
│ ├── site.db
We will be using WTForms once again for our posts</code></i> forms.py</code></i>.</h3>
from flask_wtf import FlaskForm
from wtforms import StringField, SubmitField, TextAreaField
from wtforms.validators import DataRequired
class PostForm(FlaskForm):
title = StringField('Title', validators=[DataRequired()])
content = TextAreaField('Content', validators=[DataRequired()])
submit = SubmitField('Post')
A title and content is required for our post form hence validators=[DataRequired()]. StringField is used for a shorter string of characters, perfect for the title. TextAreaField is for a larger amount of text, great for the content section. We will also be creating a submit button on this page when we create our templates.
Now lets work on the posts</code></i> routes.py</code></i> file.</h3>
from flask import (render_template, url_for, flash,
redirect, request, Blueprint)
from flask_login import current_user, login_required
from webpage import db
from webpage.models import Post
from webpage.posts.forms import PostForm
posts = Blueprint('posts', __name__)
@posts.route("/post/new", methods=['GET', 'POST'])
@login_required
def new_post():
form = PostForm()
if form.validate_on_submit():
post = Post(title=form.title.data, content=form.content.data, author=current_user)
db.session.add(post)
db.session.commit()
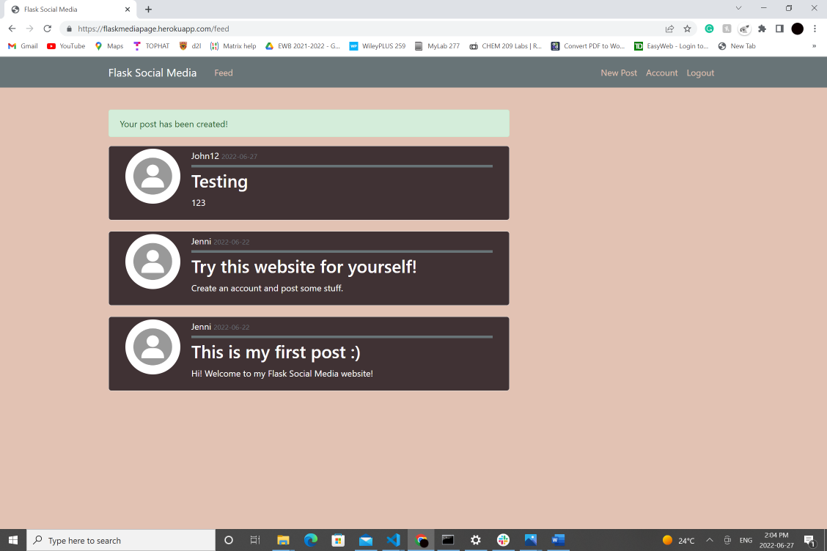
flash('Your post has been created!', 'success')
return redirect(url_for('main.feed'))
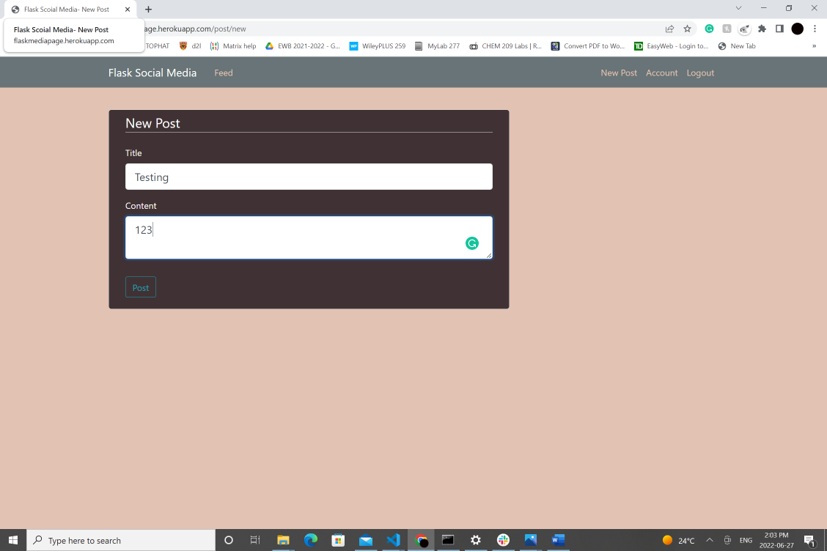
return render_template('create_post.html', title='New Post',
form=form, legend='New Post')
To create a new post, a user must be logged in. This function <code>@login_required</code> only allows logged in users to use the /post/new route. This route uses the form we just created and validates the user inputs before the post is added to the database.
A flash alert is shown when the post is created then the user is redirected to the feed page.
Now we will be creating the create_post.html file this route will render from.
Create a new template called create_post.html</code></i>.</h4>
├── webpage
│ ├── static
│ │ ├── main.css
│ ├── templates
│ │ ├── account.html
│ │ ├── create_post.html
│ │ ├── feed.html
│ │ ├── layout.html
│ │ ├── login.html
│ │ ├── register.html
│ ├── main
│ │ ├── __init__.py
│ │ ├── routes.py
│ ├── posts
│ │ ├── __init__.py
│ │ ├── forms.py
│ │ ├── routes.py
│ ├── users
│ │ ├── __init__.py
│ │ ├── forms.py
│ │ ├── routes.py
│ │ ├── save_pics.py
│ ├── __init__.py
│ ├── models.py
│ ├── site.db
Similar to the register.html</code></i> and login.html</code></i> templates, the create_post.html</code></i> template will be formatting the form with textboxes and buttons where needed using the following code:</h4>
{% extends "layout.html" %}
{% block content %}
<div class="content-section">
<form method="POST" action="">
{{ form.hidden_tag() }}
<fieldset class="form-group">
<legend class="border-bottom mb-4">{{ legend }}</legend>
<div class="form-group">
{{ form.title.label(class="form-control-label") }}
{% if form.title.errors %}
{{ form.title(class="form-control form-control-lg is-invalid") }}
<div class="invalid-feedback">
{% for error in form.title.errors %}
<span>{{ error }}</span>
{% endfor %}
</div>
{% else %}
{{ form.title(class="form-control form-control-lg") }}
{% endif %}
</div>
<div class="form-group">
{{ form.content.label(class="form-control-label") }}
{% if form.content.errors %}
{{ form.content(class="form-control form-control-lg is-invalid") }}
<div class="invalid-feedback">
{% for error in form.content.errors %}
<span>{{ error }}</span>
{% endfor %}
</div>
{% else %}
{{ form.content(class="form-control form-control-lg") }}
{% endif %}
</div>
</fieldset>
<div class="form-group">
{{ form.submit(class="btn btn-outline-info") }}
</div>
</form>
</div>
{% endblock content %}
</div>
</div>
</div>
Displaying Posts on the Feed Page
The feed page will display the posts created by the user. The code required to make this page will be in the main</code></i> module.</h3>
In the main routes.py</code></i> file, copy the following code:</h4>
from flask import render_template, Blueprint
from webpage.models import Post
main = Blueprint('main', __name__)
@main.route("/")
@main.route("/feed")
def feed():
posts = Post.query.order_by(Post.date_posted.desc())
return render_template('feed.html', posts=posts)
The feed function searches for the posts within the database and orders them by the date posted. Newer posts will appear at the top of the feed. Earlier in the blog, we created the feed.html</code></i> template in the Child Template section which this function will render from.</h4>
We already created the template for our feed page in the Child Template.
</div>
</div>
</div>
Default Profile Picture
New users or users without a profile picture, will be automatically given a default profile picture.
Since profile pictures will not alter the code as the application is running, the file we will create to save these pictures will be in the static folder. Name it profile_pics. Within this file, upload a default image. Make sure this image is named default as shown below:
├── webpage
│ ├── static
│ │ ├── main.css
│ │ ├── profile_pics
│ │ │ ├── default.jpg
│ ├── templates
│ │ ├── account.html
│ │ ├── create_post.html
│ │ ├── feed.html
│ │ ├── layout.html
│ │ ├── login.html
│ │ ├── register.html
│ ├── main
│ │ ├── __init__.py
│ │ ├── routes.py
│ ├── posts
│ │ ├── __init__.py
│ │ ├── forms.py
│ │ ├── routes.py
│ ├── users
│ │ ├── __init__.py
│ │ ├── forms.py
│ │ ├── routes.py
│ │ ├── save_pics.py
│ ├── __init__.py
│ ├── models.py
│ ├── site.db
Here is an example default image used in the website shown in this blog:

Running Your Application
While developing your program, you will need to run your code to ensure your application runs smoothly before it is deployed.
Create an app.py</code></i> file outside of the webpage</code></i> folder.</h4>
├── webpage
│ ├── static
│ │ ├── main.css
│ │ ├── profile_pics
│ │ │ ├── default.jpg
│ ├── templates
│ │ ├── account.html
│ │ ├── create_post.html
│ │ ├── feed.html
│ │ ├── layout.html
│ │ ├── login.html
│ │ ├── register.html
│ ├── main
│ │ ├── __init__.py
│ │ ├── routes.py
│ ├── posts
│ │ ├── __init__.py
│ │ ├── forms.py
│ │ ├── routes.py
│ ├── users
│ │ ├── __init__.py
│ │ ├── forms.py
│ │ ├── routes.py
│ │ ├── save_pics.py
│ ├── __init__.py
│ ├── models.py
│ ├── site.db
├── app.py
Import the following code into this file:
from webpage import app
if __name__ == '__main__':
app.run(debug=True)
The only purpose of the ap.py</code></i> is to run the code. The file grabs the app</code></i> variable from webpage __ init__.py</code></i> and runs it. The app</code></i> variable must be inside the __ init__.py</code></i> since this is where we are initializing the application.</h4>
Launching Your Site
To run the application, type “python run.py” into the terminal. Click on the http://127.0.0.1:5000 link or paste it into your browser and your website should open!
</div>
</div>
</div>
Deploying Your Website
In this section, I will be explaining how to deploy your Flask application onto the World Wide Web for free so that anyone with internet is able to access it. I will be using Heruko's "Free and Hobby" package, however, you can also upgrade to a paid package for more web functions.
Steps:
- Download Heroku Toolbelt CLI using this link
- Once installed, open your computer's command prompt terminal and make sure you are in your
FlaskWebPage</code></i> directory and that your virtual environment is active. This is what your terminal should say: (env) C:\Users\jenni\OneDrive\Desktop\FlaskWebPage>
</li>
- We will need to install gunicornpip install Gunicorn (a Python Web Server Gateway Interface (WSGI) HTTP server) and Psycopg 2 (a PostgreSQL database for Python). In the terminal type "pip install gunicorn".
(env) C:\Users\jenni\OneDrive\Desktop\FlaskWebPage>pip install gunicorn
Once Gunicorn is installed, type "pip install psycopg2".
(env) C:\Users\jenni\OneDrive\Desktop\FlaskWebPage>pip install psycopg2
Next we will have to create a file with the required packages that Heroku will need to download in order to use the different functions in our application. Create a new file called requirements.txt</code></i>.</p>
├── webpage
│ ├── static
│ │ ├── main.css
│ │ ├── profile_pics
│ │ │ ├── default.jpg
│ ├── templates
│ │ ├── account.html
│ │ ├── create_post.html
│ │ ├── feed.html
│ │ ├── layout.html
│ │ ├── login.html
│ │ ├── register.html
│ ├── main
│ │ ├── __init__.py
│ │ ├── routes.py
│ ├── posts
│ │ ├── __init__.py
│ │ ├── forms.py
│ │ ├── routes.py
│ ├── users
│ │ ├── __init__.py
│ │ ├── forms.py
│ │ ├── routes.py
│ │ ├── save_pics.py
│ ├── __init__.py
│ ├── models.py
│ ├── site.db
├── app.py
├── requirements.txt
Type "pip freeze" into the terminal:
(env) C:\Users\jenni\OneDrive\Desktop\FlaskWebPage>pip install psycopg2
Copy all the requirements into the requirements.txt</code></i> file.</p>
</blockquote>
</li>
Now we have to tell Heroku what kind of app we are running. Create a new file called "Procfile".
├── webpage
│ ├── static
│ │ ├── main.css
│ │ ├── profile_pics
│ │ │ ├── default.jpg
│ ├── templates
│ │ ├── account.html
│ │ ├── create_post.html
│ │ ├── feed.html
│ │ ├── layout.html
│ │ ├── login.html
│ │ ├── register.html
│ ├── main
│ │ ├── __init__.py
│ │ ├── routes.py
│ ├── posts
│ │ ├── __init__.py
│ │ ├── forms.py
│ │ ├── routes.py
│ ├── users
│ │ ├── __init__.py
│ │ ├── forms.py
│ │ ├── routes.py
│ │ ├── save_pics.py
│ ├── __init__.py
│ ├── models.py
│ ├── site.db
├── app.py
├── Procfile
├── requirements.txt
A Procfile tells Heroku what kind of app we are running. Type the following into the Procfile:
web: gunicorn app:app
This implies that the application is a web app using the gunicorn webserver and our app is called "app" since we named it app.py.
Create an account on the Heroku website, then type "heroku login" into the command prompt.
(env) C:\Users\jenni\OneDrive\Desktop\FlaskWebPage>heroku login
This will open up the Heroku login page.
After logging in, we can now create a unique domain for our web server. Type "heroku create" then the name of what you want to call your app. For example, "heroku create flaskmediapage" was typed into the command prompt:
(env) C:\Users\jenni\OneDrive\Desktop\FlaskWebPage>heroku create flaskmediapage
The terminal will inform you whether or not that domain name is taken. If the domain name is not taken, a URL to your website is created and should look similar to this: https://flaskmediapage.herokuapp.com/
The database we currently have is an SQLite database which was great during development of our app, however, is unable to run over a network. In order to deploy the app, we need to switch to a PostgreSQL database. To create a database with heroku, type "heroku addons:create heroku-postgresql:hobby-dev --app flasksocialmedia" into the terminal.
(env) C:\Users\jenni\OneDrive\Desktop\FlaskWebPage>heroku addons:create heroku-postgresql:hobby-dev --app flaskmediapage
Ensure the last word of this command is the name of your app you chose from step 7. Now you have a free empty database.
Now we have to alter our code to make sure our application is using the PostgreSQL database. First we need to get the URL for database. Type this into your command prompt: "heroku config --app flaskmediapage".
(env) C:\Users\jenni\OneDrive\Desktop\FlaskWebPage>heroku config --app flaskmediapage
This should create a URL similar to this:
postgres://baeiyrmyxoecvu:c38f07af1eb3ad0da3e952189097972948241444bafe16ebfe86227aa089e8f1@ec2-52-206-182-219.compute-1.amazonaws.com:5432/des45gq4vda2q
Now copy this URL and paste it into the webpage __ init__.py</code></i> file, replacing the SQLite link we initially had. Add "ql" after "postgres" to indicate that it is an SQLAlchemy database Your code should look like this:
```
from flask import Flask
from flask_sqlalchemy import SQLAlchemy
from flask_bcrypt import Bcrypt
from flask_login import LoginManager</p>
</blockquote>
</li>
</ol>
app = Flask(name)
app.config['SECRET_KEY'] = '5791628bb0b13ce0c676dfde280ba245'
app.config['SQLALCHEMY_DATABASE_URI'] = 'postgresql://baeiyrmyxoecvu:c38f07af1eb3ad0da3e952189097972948241444bafe16ebfe86227aa089e8f1@ec2-52-206-182-219.compute-1.amazonaws.com:5432/des45gq4vda2q'
db = SQLAlchemy(app)
bcrypt = Bcrypt(app)
login_manager = LoginManager(app)
from webpage.users.routes import users
from webpage.posts.routes import posts
from webpage.main.routes import main
app.register_blueprint(users)
app.register_blueprint(posts)
app.register_blueprint(main)
10. We will be pushing our application onto Heroku using Github repositories.
* Create a <code><i>.gitignore</code></i> file.
```bash
├── webpage
│ ├── static
│ │ ├── main.css
│ │ ├── profile_pics
│ │ │ ├── default.jpg
│ ├── templates
│ │ ├── account.html
│ │ ├── create_post.html
│ │ ├── feed.html
│ │ ├── layout.html
│ │ ├── login.html
│ │ ├── register.html
│ ├── main
│ │ ├── __init__.py
│ │ ├── routes.py
│ ├── posts
│ │ ├── __init__.py
│ │ ├── forms.py
│ │ ├── routes.py
│ ├── users
│ │ ├── __init__.py
│ │ ├── forms.py
│ │ ├── routes.py
│ │ ├── save_pics.py
│ ├── __init__.py
│ ├── models.py
│ ├── site.db
├── .gitignore
├── app.py
├── Procfile
├── requirements.txt
Paste the following code:
# Byte-compiled / optimized / DLL files
__pycache__/
*.py[cod]
*$py.class
# C extensions
*.so
# Distribution / packaging
.Python
build/
develop-eggs/
dist/
downloads/
eggs/
.eggs/
lib/
lib64/
parts/
sdist/
var/
wheels/
share/python-wheels/
*.egg-info/
.installed.cfg
*.egg
MANIFEST
# PyInstaller
# Usually these files are written by a python script from a template
# before PyInstaller builds the exe, so as to inject date/other infos into it.
*.manifest
*.spec
# Installer logs
pip-log.txt
pip-delete-this-directory.txt
# Unit test / coverage reports
htmlcov/
.tox/
.nox/
.coverage
.coverage.*
.cache
nosetests.xml
coverage.xml
*.cover
*.py,cover
.hypothesis/
.pytest_cache/
cover/
# Translations
*.mo
*.pot
# Django stuff:
*.log
local_settings.py
db.sqlite3
db.sqlite3-journal
# Flask stuff:
instance/
.webassets-cache
# Scrapy stuff:
.scrapy
# Sphinx documentation
docs/_build/
# PyBuilder
.pybuilder/
target/
# Jupyter Notebook
.ipynb_checkpoints
# IPython
profile_default/
ipython_config.py
# pyenv
# For a library or package, you might want to ignore these files since the code is
# intended to run in multiple environments; otherwise, check them in:
# .python-version
# pipenv
# According to pypa/pipenv#598, it is recommended to include Pipfile.lock in version control.
# However, in case of collaboration, if having platform-specific dependencies or dependencies
# having no cross-platform support, pipenv may install dependencies that don't work, or not
# install all needed dependencies.
#Pipfile.lock
# poetry
# Similar to Pipfile.lock, it is generally recommended to include poetry.lock in version control.
# This is especially recommended for binary packages to ensure reproducibility, and is more
# commonly ignored for libraries.
# https://python-poetry.org/docs/basic-usage/#commit-your-poetrylock-file-to-version-control
#poetry.lock
# pdm
# Similar to Pipfile.lock, it is generally recommended to include pdm.lock in version control.
#pdm.lock
# pdm stores project-wide configurations in .pdm.toml, but it is recommended to not include it
# in version control.
# https://pdm.fming.dev/#use-with-ide
.pdm.toml
# PEP 582; used by e.g. github.com/David-OConnor/pyflow and github.com/pdm-project/pdm
__pypackages__/
# Celery stuff
celerybeat-schedule
celerybeat.pid
# SageMath parsed files
*.sage.py
# Environments
.env
.venv
env/
venv/
ENV/
env.bak/
venv.bak/
# Spyder project settings
.spyderproject
.spyproject
# Rope project settings
.ropeproject
# mkdocs documentation
/site
# mypy
.mypy_cache/
.dmypy.json
dmypy.json
# Pyre type checker
.pyre/
# pytype static type analyzer
.pytype/
# Cython debug symbols
cython_debug/
# PyCharm
# JetBrains specific template is maintained in a separate JetBrains.gitignore that can
# be found at https://github.com/github/gitignore/blob/main/Global/JetBrains.gitignore
# and can be added to the global gitignore or merged into this file. For a more nuclear
# option (not recommended) you can uncomment the following to ignore the entire idea folder.
#.idea/
This file tells Git which files to not commit.
- Type "git init" into the command prompt to initialize your repository.
(env) C:\Users\jenni\OneDrive\Desktop\FlaskWebPage>git init
- "git add -A" collects all the files.
(env) C:\Users\jenni\OneDrive\Desktop\FlaskWebPage>git add -A
- "git commit -m "initial commit"" commits the files into the repository.
(env) C:\Users\jenni\OneDrive\Desktop\FlaskWebPage>git commit -m "initial commit"
- "git push heroku master" pushes the repository onto Heroku.
(env) C:\Users\jenni\OneDrive\Desktop\FlaskWebPage>git push heroku master
- The last step is to migrate the PostgreSQL database, similar to what we did with SQLite.
- Type "heroku run python" in the command prompt.
(env) C:\Users\jenni\OneDrive\Desktop\FlaskWebPage>heroku run python
Now we will import our database:
>>> from webpage import db
Then we will create the database:>>>> db.create_all()
- Exit out of the python terminal:
>>> exit()
Now you should have your own fully functioning social media page!
You can paste the URL you are given from step 7 into your browser or use the following command to open your web server:>(env) C:\Users\jenni\OneDrive\Desktop\FlaskWebPage>heroku open
</div>
</div>
</div>
Sources
- Schafer, C. (2018, May 4). Python flask tutorial: Full-featured web app part 1 - getting started. YouTube. Retrieved June 26, 2022, from https://www.youtube.com/watch?v=MwZwr5Tvyxo&list=PL-osiE80TeTs4UjLw5MM6OjgkjFeUxCYH
- Walker, R. (n.d.). Education at bat: Seven principles for educators. Harvard Graduate School of Education. Retrieved June 26, 2022, from https://www.gse.harvard.edu/news/uk/09/01/education-bat-seven-principles-educators
- Mark Otto, J. T. (n.d.). Bootstrap. Bootstrap · The most popular HTML, CSS, and JS library in the world. Retrieved June 26, 2022, from https://getbootstrap.com/
- Real Python. (2021, February 6). Use a flask blueprint to architect your applications. Real Python. Retrieved June 27, 2022, from https://realpython.com/flask-blueprint/
- Jemastock. (2019, April 17). Thumb up icon vector image on vectorstock. VectorStock. Retrieved June 27, 2022, from https://www.vectorstock.com/royalty-free-vector/thumb-up-icon-vector-24957601
- CoreyMSchafer. (n.d.). Code_snippets/python/flask_blog at master · coreymschafer/code_snippets. GitHub. Retrieved June 27, 2022, from https://github.com/CoreyMSchafer/code_snippets/tree/master/Python/Flask_Blog
- Github. (2021, December 11). Gitignore/jetbrains.gitignore at main · github/gitignore. GitHub. Retrieved June 27, 2022, from https://github.com/github/gitignore/blob/main/Global/JetBrains.gitignore
- Codemy.com. (2022, January 14). Deploy flask app with database on Heroku for webhosting - flask fridays #39. YouTube. Retrieved June 27, 2022, from https://www.youtube.com/watch?v=SiCAIRc0pEI
</div>
from flask import Flask
app = Flask(__name__)
from webpage.users.routes import users
from webpage.posts.routes import posts
from webpage.main.routes import main
app.register_blueprint(users)
app.register_blueprint(posts)
app.register_blueprint(main)</div> </div> </div>
app = Flask(__ name__)is used in every Flask app in order to inherit the attributes and methods from the Flask class.
Virtual Environment
It is important that we are programming in a virtual environment to avoid instally Python packages globally. This will save us some time and make deploying our flask application easier.
Steps:
- Ensure the virtual environment package is installed on VSCode by typing in the terminal “pip install virtualenv”.
- Create your virtual environment by typing “virtualenv env”
- Activate your virtual environment with “env\Scripts\activate.bat” or for a MacBook “source env/bin/activate”.
Ensure your virtual environment is activate when you install packages. This will be beneficial when creating your
requirements.txt</code></i> file when we cover Deploying your Website.</p> </blockquote> </li> </ol>Here is a list of packages you will need to install:```BareNecessities==0.2.8
bcrypt==3.2.2 blinker==1.4 cffi==1.15.0 click==8.1.3 colorama==0.4.5 dnspython==2.2.1 email-validator==1.2.1 Flask==2.1.2 Flask-Bcrypt==1.0.1 Flask-Login==0.6.1 Flask-Mail==0.9.1 Flask-SQLAlchemy==2.5.1 Flask-WTF==1.0.1 greenlet==1.1.2 gunicorn==20.1.0 idna==3.3 importlib-metadata==4.11.4 itsdangerous==2.1.2 Jinja2==3.1.2 Mail==2.1.0 MarkupSafe==2.1.1 Pillow==9.1.1 psycopg2==2.9.3 pycparser==2.21 SQLAlchemy==1.4.37 Werkzeug==2.1.2 WTForms==3.0.1 zipp==3.8.0 ```
</div> </div> </div>Templates (HTML)
Templates allow you to create the content and layout of the different pages of your website with its own HTML file. In this section, you will learn how to create a parent and child template. Throughout the blog, you will need to make a unique child template for every page on your website.
Within your
templatesfolder, create three files: a file namedlayout.html, and a file namedfeed.html.├── webpage │ ├── static │ ├── templates │ │ ├── feed.html │ │ ├── layout.html │ ├── main │ │ ├── __init__.py │ │ ├── routes.py │ ├── posts │ │ ├── __init__.py │ │ ├── routes.py │ ├── users │ │ ├── __init__.py │ │ ├── routes.py │ ├── __init__.py │ ├── models.py
Parent Template
The
layout.htmlfile will be the parent template, providing a base containing the common elements of our website. The other templates (child templates) will inherit these common elements.This is the code we will be working with in our
layout.htmlfile:<!DOCTYPE html> <html> <head> <!-- Required meta tags --> <meta charset="utf-8"> <meta name="viewport" content="width=device-width, initial-scale=1, shrink-to-fit=no"> <!-- Bootstrap CSS --> <link rel="stylesheet" href="https://maxcdn.bootstrapcdn.com/bootstrap/4.0.0/css/bootstrap.min.css" integrity="sha384-Gn5384xqQ1aoWXA+058RXPxPg6fy4IWvTNh0E263XmFcJlSAwiGgFAW/dAiS6JXm" crossorigin="anonymous"> <link rel="stylesheet" type="text/css" href="{{ url_for('static', filename='main.css') }}"> {% if title %} <title>Flask Scoial Media- {{ title }}</title> {% else %} <title>Flask Social Media</title> {% endif %} </head> <body> <header class="site-header"> <nav class="navbar navbar-expand-md navbar-dark bg-steel fixed-top"> <div class="container"> <a class="navbar-brand mr-4" href="/">Flask Social Media</a> <button class="navbar-toggler" type="button" data-toggle="collapse" data-target="#navbarToggle" aria-controls="navbarToggle" aria-expanded="false" aria-label="Toggle navigation"> <span class="navbar-toggler-icon"></span> </button> <div class="collapse navbar-collapse" id="navbarToggle"> <div class="navbar-nav mr-auto"> <a class="nav-item nav-link" href="{{ url_for('main.feed') }}">Feed</a> </div> <!-- Navbar Right Side --> <div class="navbar-nav"> {% if current_user.is_authenticated %} <a class="nav-item nav-link" href="{{ url_for('posts.new_post') }}">New Post</a> <a class="nav-item nav-link" href="{{ url_for('users.account') }}">Account</a> <a class="nav-item nav-link" href="{{ url_for('users.logout') }}">Logout</a> {% else %} <a class="nav-item nav-link" href="{{ url_for('users.login') }}">Login</a> <a class="nav-item nav-link" href="{{ url_for('users.register') }}">Register</a> {% endif %} </div> </div> </div> </nav> </header> <main role="main" class="container"> <div class="row"> <div class="col-md-8"> {% with messages = get_flashed_messages(with_categories=true) %} {% if messages %} {% for category, message in messages %} <div class="alert alert-{{ category }}"> {{ message }} </div> {% endfor %} {% endif %} {% endwith %} {% block content %}{% endblock %} </div> </div> </main> <!-- Optional JavaScript --> <!-- jQuery first, then Popper.js, then Bootstrap JS --> <script src="https://code.jquery.com/jquery-3.2.1.slim.min.js" integrity="sha384-KJ3o2DKtIkvYIK3UENzmM7KCkRr/rE9/Qpg6aAZGJwFDMVNA/GpGFF93hXpG5KkN" crossorigin="anonymous"></script> <script src="https://cdnjs.cloudflare.com/ajax/libs/popper.js/1.12.9/umd/popper.min.js" integrity="sha384-ApNbgh9B+Y1QKtv3Rn7W3mgPxhU9K/ScQsAP7hUibX39j7fakFPskvXusvfa0b4Q" crossorigin="anonymous"></script> <script src="https://maxcdn.bootstrapcdn.com/bootstrap/4.0.0/js/bootstrap.min.js" integrity="sha384-JZR6Spejh4U02d8jOt6vLEHfe/JQGiRRSQQxSfFWpi1MquVdAyjUar5+76PVCmYl" crossorigin="anonymous"></script> </body> </html>
Using Bootstrap for your templates, can make designing your web page quicker and easier. I used their Starter Template from their official website: Bootstrap website.
To link the CSS file that we will be creating in the Design Your Website (CSS) section, use
link rel="stylesheet" type="text/css" href=""to indicate that the location of our stylesheet will be in thestaticfolder in the filemain.csswhich we will be creating later on in blog.div class=”alert alert-”will allow us to send out alerts to the user on our webpage every time the user successfully fills out a form such as signing up, logging in, creating posts, or updating their account. In ourlayout.html, we have to useget_flashed_messages()to return the category. Here is an example of an alert:nav class=”navbar navbar-expand-md navbar-dark bg-steel fixed-top”creates a navigation bar at the top of our webpage. We can display the title of our site usingclass="navbar-brand mr-3" href="/">Flask Social Media.On the left side of the navigation bar, we can add links to the home and about page by using
div class=”navbar-nav mr-auto”.On the right side of the navigation bar, we can add links to the login and register page by using
div class=”navbar-nav”.{% block content %}{% endblock %}is used for overriding specific parts of thelayout.htmltemplate that will need to be unique to certain pages. This will need to be incorporated in every child template you create to ensure your website shows the relevant information for each page.Child Template
First lets create our template for our feed page. This will be where users can scroll and read posts made by themselves and other users.
In your
feed.htmlfile, copy the following code:{% extends "layout.html" %} {% block content %} {% for post in posts %} <article class="media content-section"> <img class="rounded-circle article-img" src="{{ url_for('static', filename='profile_pics/' + post.author.image_file) }}"> <div class="media-body"> <div class="article-metadata"> <a> {{ post.author.username }}</a> <small class="text-muted">{{ post.date_posted.strftime('%Y-%m-%d') }}</small> </div> <h2><a>{{ post.title }}</a></h2> <p class="article-content">{{ post.content }}</p> </div> </article> {% endfor %} {% endblock content %}In order to inherit from our parent template, use
{% extends "layout.html" %}.Like I mentioned in the Parent Template section, we will use
{% block content %}{% endblock content %}to create the specific content on each page.On our feed page, we will be displaying the posts. The code block
{% for post in posts %}will retrieve information from a post object containing information about the author, the date the post was posted, the title, and the content that we will be covering later on in in the Databases (SQLAlchemy) section.We can use Bootstrap to customize the shape of the user's profile picture that will be displayed on the posts using
"rounded-circle article-img".url_for('static', filename='profile_pics/' + post.author.image_file)tells the program where to look to obtain the profile pictures. In this case, the user's profile pictures will be under thestatic</code></i> folder, in a file namedprofile_pics</code></i> which we will be creating in the Default Profile Picture section.</h4>url_for</code></i> is a really useful function that helps determine the exact location to route to. We will be seeing more of this throughout the blog.</h4>Secret Key
When using forms, it is ideal that we create a “secret key” to prevent hijacking of the web application. This is used to sign session cookies and protect against cookie data tampering. It is necessary to avoid sharing this key to keep your Flask application secure.
Update the
webpage __ init.pyfile with the following code:from flask import Flask from flask_sqlalchemy import SQLAlchemy app = Flask(__name__) app.config['SECRET_KEY'] = '5791628bb0b13ce0c676dfde280ba245' from webpage.users.routes import users from webpage.posts.routes import posts from webpage.main.routes import main app.register_blueprint(users) app.register_blueprint(posts) app.register_blueprint(main)Use
</div> </div> </div>app.config['SECRET_KEY']to implement your key. Your key can be anything you wish, however, it is important that your key is hard to guess. I would recommend using a random string generator to generate a long random string.Designing your Web Page (CSS)
To add custom style and format your HTML templates, you will need to create a Cascading Style Sheets (CSS). CSS is a style language considered static because there is no interaction with the code.
In your
staticfolder, create a file namedmain.css</code></i>.</h4>├── webpage │ ├── static │ │ ├── main.css │ ├── templates │ │ ├── feed.html │ │ ├── layout.html │ ├── main │ │ ├── __init__.py │ │ ├── routes.py │ ├── posts │ │ ├── __init__.py │ │ ├── routes.py │ ├── users │ │ ├── __init__.py │ │ ├── routes.py │ ├── __init__.py │ ├── models.py
CSS is a relatively straight forward language.
This is the code I used to design the webpage shown in this blog. Feel free to adjust the CSS code in the
main.css</code></i> file to personalize the theme of your website to your liking.</h4>body { background: #E2C2B3; color: #fff; margin-top: 6rem; } h1, h2, h3, h4, h5, h6 { color: #ffff; } .bg-steel { background-color: #687477; } .site-header .navbar-nav .nav-link { color: #E2C2B3; } .site-header .navbar-nav .nav-link.active { font-weight: 100; } .content-section { padding: 4px 30px; background: #403234; border: 1px solid #dddddd; border-radius: 5px; margin-bottom: 20px; } .article-title { color: #ffff; } .article-content { white-space: pre-line; } .article-img { height: 100px; width: 100px; margin-right: 20px; } .article-metadata { padding-bottom: 5px; margin-bottom: 5px; border-bottom: 5px solid #687477 } .article-svg { width: 25px; height: 25px; vertical-align: middle; } .account-img { height: 125px; width: 125px; margin-right: 20px; margin-bottom: 16px; } .account-heading { font-size: 2rem; }
</div> </div> </div>Common CSS Properties Description background Pick the background color or image, position, size, repeat (how the images are repeated), origin, clip (painting area), attachment (whether images are fixed or scrolls), initial (sets to default value), or whether to inherit from parent template color Specify the text color font Pick your desired font style, variant, weight, size and font-family padding Specify how much space is needed on top, bottom, left, or right side of elements. border Pick the type of border: dotted, dashed, solid, double, groove, ridge, inset, outset, no border, hidden border, mixed border. margin Set different margins on the top, bottom, right, and left side text-decoration Choose decorations like underline, overline, line-through, underline overline, as well as the color, style and thickness. Databases(SQLAlchemy)
SQLAlchemy allows programmers to easily convert data stored in a database into objects. We will be using this database to store information about the user and create a one-to-many relationship between the user's account such as their username, email, and profile picture, as well as their posts.
First, we need to create a URI for the database to use. For development purposes, we will be using SQLite which is a lightweight, fast open SQL engine - this will have to be replaced when we deploy the website later on. Then we will use the “app” parameter to create a database instance.
Open the
webage __ init__.py</code></i> file. Update the code to the following:</h4>from flask import Flask from flask_sqlalchemy import SQLAlchemy app = Flask(__name__) app.config['SECRET_KEY'] = '5791628bb0b13ce0c676dfde280ba245' app.config['SQLALCHEMY_DATABASE_URI'] = 'sqlite:///site.db' db = SQLAlchemy(app) from webpage.users.routes import users from webpage.posts.routes import posts from webpage.main.routes import main app.register_blueprint(users) app.register_blueprint(posts) app.register_blueprint(main)Now to create our datbases to save the user's account information and their posts, code the following in the
webpage models.pyfile.from datetime import datetime from webpage import db, login_manager from flask_login import UserMixin @login_manager.user_loader def load_user(user_id): return User.query.get(int(user_id)) class User(db.Model, UserMixin): id = db.Column(db.Integer, primary_key=True) username = db.Column(db.String(20), unique=True, nullable=False) email = db.Column(db.String(120), unique=True, nullable=False) image_file = db.Column(db.String(130), nullable=False, default='default.jpg') password = db.Column(db.String(60), nullable=False) posts = db.relationship('Post', backref='author', lazy=True) def __repr__(self): return f"User('{self.username}', '{self.email}', '{self.image_file}')" class Post(db.Model): id = db.Column(db.Integer, primary_key=True) title = db.Column(db.String(100), nullable=False) date_posted = db.Column(db.DateTime, nullable=False, default=datetime.utcnow) content = db.Column(db.Text, nullable=False) user_id = db.Column(db.Integer, db.ForeignKey('user.id'), nullable=False) def __repr__(self): return f"Post('{self.title}', '{self.date_posted}')"In this file, we will be creating two databases. the first one will be the
class User(db.Model)which will contain the user information, and the second one will beclass Post(db.Model)which will store data about each post.class User(db.Model)will take in theUserMixinparameter which allows the program to incorporate the following properties:- is_authenticated() returns True if the user has provided valid credentials.
- is_active() returns True if the user’s account is active.
- is_anonymous() returns True if the current user is an anonymous user.
- get_id() given a User instance, returns the unique ID for that object.
To use this
login_managerextension, we will have to tell the program how to find one of our users by their id. The <code>@login_manager</code> is a key naming convention that identifies that this is the function specifying how to get a user by their id.load_user, takes theuser_idas the parameter and gets the user usinguser.query.getfrom the database we will be creating next.We imported
dbwhich will allow us to program the SQLAlchemy database anddatetime.1. The
class User(db.Model)is created first.This object will create a table containing user information. An unique
idwill be given to our users so we will setprimary_key=True.The username will have
db.string(17)because I set the maximum characters for the username to be 17. We also want each username to be unique, hence,unique=True. Each user is required to have a username sonullable=False.The user’s profile image will be limited to 22 characters. A default image will be provided to those without profile images, therefore
nullable=False.To link the user with their own posts, we will need to use
db.relationshipto associate with ourPostmodel which we will make in the next step. The functionbackref=’author’allows us to retrieve the user of the post.lazyloading allows us to retrieve every post from a single user.def __repr__(self):represents the string from our User object in a printable representation. This will come in handy when displaying the posts to the feed page.2. Then we create
class Post(db.Model).Each post will need a title, therefore
nullable=False. The title is also limited to 150 characters.The posts will also show the time posted using
db.DateTimewhich we imported earlier. The functiondatetime.utcnowwill allow our program to determine the current time the post was posted.The content will have the text and does not have to be unique.
We need our database to correlate the
user.idto their post. The functiondb.ForeignKeyallows the program to reference information from theuser_idcolumn (child table) to thePostcolumn (parent table).The printable representation of our post will show the title and the date posted.
Lastly, we need to create the database.
- In your terminal, first type “python”.
- Then type “from flaskblog import db”.
- Finally type “db.create_all()”.
Since we are using SQLite, a site.db file will be created in our directory.
├── webpage │ ├── static │ │ ├── main.css │ ├── templates │ │ ├── feed.html │ │ ├── layout.html │ ├── main │ │ ├── __init__.py │ │ ├── routes.py │ ├── posts │ │ ├── __init__.py │ │ ├── routes.py │ ├── users │ │ ├── __init__.py │ │ ├── routes.py │ ├── __init__.py │ ├── models.py │ ├── site.db
Now we have a database!
</div> </div> </div>Sign-up and Log-in
Every file related to creating, updating or validating a user's account will be found in the
usersmodule. Currently we have a__ init__.pyand aroutes.pyfile withinusers. We will also need to add ausers forms.pyfile.├── webpage │ ├── static │ │ ├── main.css │ ├── templates │ │ ├── feed.html │ │ ├── layout.html │ ├── main │ │ ├── __init__.py │ │ ├── routes.py │ ├── posts │ │ ├── __init__.py │ │ ├── routes.py │ ├── users │ │ ├── __init__.py │ │ ├── forms.py │ │ ├── routes.py │ ├── __init__.py │ ├── models.py │ ├── site.db
WTForms
Within
usersforms.pyfile, we will use a function called WTForms - a handy Flask extension that allows programmers to easily validate forms and deploy security features. Perfect for sign-up and log-in pages!from flask_wtf import FlaskForm from flask_wtf.file import FileField, FileAllowed from wtforms import StringField, PasswordField, SubmitField, BooleanField from wtforms.validators import DataRequired, Length, Email, EqualTo, ValidationError from webpage.models import User class RegistrationForm(FlaskForm): username = StringField('Username', validators=[DataRequired(), Length(min=5, max=17)]) email = StringField('Email', validators=[DataRequired(), Email()]) password = PasswordField('Password', validators=[DataRequired()]) confirm_password = PasswordField('Confirm Password', validators=[DataRequired(), EqualTo('password')]) submit = SubmitField('Sign Up') def validate_username(self, username): user = User.query.filter_by(username=username.data).first() if user: raise ValidationError('That username is taken. Please choose a different one.') def validate_email(self, email): user = User.query.filter_by(email=email.data).first() if user: raise ValidationError('That email is taken. Please choose a different one.') class LoginForm(FlaskForm): email = StringField('Email', validators=[DataRequired(), Email()]) password = PasswordField('Password', validators=[DataRequired()]) remember = BooleanField('Remember Me') submit = SubmitField('Login') class UpdateAccountForm(FlaskForm): username = StringField('Username', validators=[DataRequired(), Length(min=5, max=17)]) email = StringField('Email', validators=[DataRequired(), Email()]) picture = FileField('Update Profile Picture', validators=[FileAllowed(['jpg', 'png'])]) submit = SubmitField('Update')The
RegistrationFormClass will take in the necessary information from the user to create an account.We will be using validators to create certain requirements for the user’s account. For example,
validators=[DataRequired(), Length(min=5, max=17)]ensures usernames have a minimum of 5 characters and a maximum of 17.We can also validate their email to ensure it is legitimate with
Email(). We use theEqualTovalidator for the password to ensure the password and the password confirmation are the same.The user can then click 'Sign Up' on the website to submit their form. 'Sign Up' will be displayed as a button, which we will create using Bootstrap in our template
register.html</code></i> we will be creating later on in this section.</h4>The
def validate_username</code></i> anddef validate_email</code></i> ensures that there are no duplicates within the database.User.query.filter_by</code></i> is a helpful function that filters through the application's database to look for the relevant information. Ifuser</code></i> returns True, aValidationErrormessage will occur.</h4>Similarly, we will create the
LoginFormClass. Here we will be asking the user for their email and password to log-in. A remember field can be incorporated by usingBooleanFieldwhich allows the user to pick between “true” or “false”. Then the user submits the form by pressing 'Login'.Finally, the
UpdateAccountFormClass will take in a username and email with the same requirements from theRegistrationFormClass. This form will also allow users to update their profile picture only as a .jpg or .png file.Routing
usersroutes.py</code></i> will be used to route to different pages using the.routefunction. This function allows you to create a unique URL for each page. For example, we made the path to the sign up page “/register”. The URL 127.0.0.1:5000/about will route us here. We will be usingrender_templateto allow the program to generate output from our HTML template files we created.</h3>from flask import render_template, url_for, flash, redirect, request, Blueprint from flask_login import login_user, current_user, logout_user, login_required from webpage import db, bcrypt from webpage.models import User from webpage.users.forms import (RegistrationForm, LoginForm, UpdateAccountForm) from webpage.users.save_pics import save_picture users = Blueprint('users', __name__) @users.route("/register", methods=['GET', 'POST']) def register(): if current_user.is_authenticated: return redirect(url_for('main.feed')) form = RegistrationForm() if form.validate_on_submit(): hashed_password = bcrypt.generate_password_hash(form.password.data).decode('utf-8') user = User(username=form.username.data, email=form.email.data, password=hashed_password) db.session.add(user) db.session.commit() flash('Your account has been created!', 'success') return redirect(url_for('users.login')) return render_template('register.html', title='Register', form=form) @users.route("/login", methods=['GET', 'POST']) def login(): if current_user.is_authenticated: return redirect(url_for('main.feed')) form = LoginForm() if form.validate_on_submit(): user = User.query.filter_by(email=form.email.data).first() if user and bcrypt.check_password_hash(user.password, form.password.data): login_user(user, remember=form.remember.data) next_page = request.args.get('next') return redirect(next_page) if next_page else redirect(url_for('main.feed')) else: flash('Login Unsuccessful.', 'danger') return render_template('login.html', title='Login', form=form) @users.route("/logout") def logout(): logout_user() return redirect(url_for('main.feed')) @users.route("/account", methods=['GET', 'POST']) @login_required def account(): form = UpdateAccountForm() if form.validate_on_submit(): if form.picture.data: picture_file = save_picture(form.picture.data) current_user.image_file = picture_file current_user.username = form.username.data current_user.email = form.email.data db.session.commit() flash('Account updated!', 'success') return redirect(url_for('users.account')) elif request.method == 'GET': form.username.data = current_user.username form.email.data = current_user.email image_file = url_for('static', filename='profile_pics/' + current_user.image_file) return render_template('account.html', title='Account', image_file=image_file, form=form)The
‘GET’and‘POST’requests are required to retrieve and send the user’s information from and to our web server.form.validate_on_submitwill indicate if the form is accepted by all the validator fields when submitted to determine where the webpage should reroute to.url_forwill determine the exact location of the route.flashallows us to generate message alerts using Bootstrap. This is used to inform the user if they have successfully logged in or if their login was unsuccessful.When registering, a user is redirected to the feed page. The function to route to the feed page will be in the
main</code></i> folder hence'main.feed'. Theroutes.py</code></i> file will also require access to the forms we previously created in theforms.py</code></i>.if form.validate_on_submit()will check if the form is valid, then will start hashing using Bcrypt the password that the user inputed before saving it in the database. Aflashmessage informing the user that their account has been created appears, then they are redirected to the login page.</h4>Hashing is irreversible; unlike encryption and encoding, there is no way to de-hash a password. It is good practice to hash sensitive information like passwords incase of potential data leaks. The user's information and hashed password is added to the database - the actual password is never stored!
The login page will check whether the information that the user inputs on the form matched the database.
user = User.query.filter_by(email=form.email.data).first()checks the email that the user inputs with the database to see if it exists. Then if user is true (email matches with the database), the program checks the password that the user inputted with the password that was remembered by the program (this password is the unhashed password that is not saved in the database, only remembered). If successful, user will be redirected to their feed, else, a flash message will appear.flask_loginprovides an easy to uselogout_userfunction.To update your account,
flask_loginensures that the user is logged in using <code>@login_required</code>. Using theUpdateAccountForm()we created in theforms.py</code></i> file will be used here to replace the original data with the newly inputted data. The account data will be immediately updatted in the account page.</h4>To use
Bcryptandflask_loginwe will need to create instances with these functions in thewebpage __ init__.py</code>, similar to how we created instances forSQLAlchemy.</h3>Update the code in
webpage __ init__.py</code> with the following:</h4>from flask import Flask from flask_sqlalchemy import SQLAlchemy from flask_bcrypt import Bcrypt from flask_login import LoginManager app = Flask(__name__) app.config['SECRET_KEY'] = '5791628bb0b13ce0c676dfde280ba245' app.config['SQLALCHEMY_DATABASE_URI'] = 'sqlite:///site.db' db = SQLAlchemy(app) bcrypt = Bcrypt(app) login_manager = LoginManager(app) from webpage.users.routes import users from webpage.posts.routes import posts from webpage.main.routes import main app.register_blueprint(users) app.register_blueprint(posts) app.register_blueprint(main)Saving Profile Pictures
We will also need another file in our
users</code></i> file in order to save the profile pictures. Create asave_pics.py</code></i> file.</h3>├── webpage │ ├── static │ │ ├── main.css │ ├── templates │ │ ├── feed.html │ │ ├── layout.html │ ├── main │ │ ├── __init__.py │ │ ├── routes.py │ ├── posts │ │ ├── __init__.py │ │ ├── routes.py │ ├── users │ │ ├── __init__.py │ │ ├── forms.py │ │ ├── routes.py │ │ ├── save_pics.py │ ├── __init__.py │ ├── models.py │ ├── site.db
Import the following code:
import os import secrets from PIL import Image from webpage import app def save_picture(form_picture): random_hex = secrets.token_hex(10) _, f_ext = os.path.splitext(form_picture.filename) picture_fn = random_hex + f_ext picture_path = os.path.join(app.root_path, 'static/profile_pics', picture_fn) output_size = (130, 130) i = Image.open(form_picture) i.thumbnail(output_size) i.save(picture_path) return picture_fnTo avoid saving pictures with the same name, we can import
secretsand use thesecrets.token_hex()function to generate a random hex.We need to make sure the file extension is the same when it is saved. in order to determine the file extension we can use
osand thesplit.textfunction. The final picture name that will be stored will be the random hex with the picture extension. This is this saved to theprofile_picfile within thestaticfolder.Before the image is saved, we also need to resize it. Using
Imageprogrammers can open and resize the image to a certain size. The program will resize the image to theoutput_sizebefore saving.Now we have to create templates for our log-in and register pages.
Within
templates</code></i>, create a file namedlogin.html</code></i> andregister.html</code></i>.</h4>├── webpage │ ├── static │ │ ├── main.css │ ├── templates │ │ ├── feed.html │ │ ├── layout.html │ │ ├── login.html │ │ ├── register.html │ ├── main │ │ ├── __init__.py │ │ ├── routes.py │ ├── posts │ │ ├── __init__.py │ │ ├── routes.py │ ├── users │ │ ├── __init__.py │ │ ├── forms.py │ │ ├── routes.py │ │ ├── save_pics.py │ ├── __init__.py │ ├── models.py │ ├── site.db
Copy the following code into
register.html</code></i></strong>:</h4>{% extends "layout.html" %} {% block content %} <div class="content-section"> <form method="POST" action=""> {{ form.hidden_tag() }} <fieldset class="form-group"> <legend class="border-bottom mb-4">Join Today</legend> <div class="form-group"> {{ form.username.label(class="form-control-label") }} {% if form.username.errors %} {{ form.username(class="form-control form-control-lg is-invalid") }} <div class="invalid-feedback"> {% for error in form.username.errors %} <span>{{ error }}</span> {% endfor %} </div> {% else %} {{ form.username(class="form-control form-control-lg") }} {% endif %} </div> <div class="form-group"> {{ form.email.label(class="form-control-label") }} {% if form.email.errors %} {{ form.email(class="form-control form-control-lg is-invalid") }} <div class="invalid-feedback"> {% for error in form.email.errors %} <span>{{ error }}</span> {% endfor %} </div> {% else %} {{ form.email(class="form-control form-control-lg") }} {% endif %} </div> <div class="form-group"> {{ form.password.label(class="form-control-label") }} {% if form.password.errors %} {{ form.password(class="form-control form-control-lg is-invalid") }} <div class="invalid-feedback"> {% for error in form.password.errors %} <span>{{ error }}</span> {% endfor %} </div> {% else %} {{ form.password(class="form-control form-control-lg") }} {% endif %} </div> <div class="form-group"> {{ form.confirm_password.label(class="form-control-label") }} {% if form.confirm_password.errors %} {{ form.confirm_password(class="form-control form-control-lg is-invalid") }} <div class="invalid-feedback"> {% for error in form.confirm_password.errors %} <span>{{ error }}</span> {% endfor %} </div> {% else %} {{ form.confirm_password(class="form-control form-control-lg") }} {% endif %} </div> </fieldset> <div class="form-group"> {{ form.submit(class="btn btn-outline-info") }} </div> </form> </div> <div class="border-top pt-3"> </div> {% endblock content %}form.hidden _tag()works with the secret key to add protection against CSRF attacks.We need to create a
div class=”form-group”>for each of our variables.Username, email, and password will use the Bootstrap class
form-control-labelto create a text box for the user the type in the information.The submit variable will use
btn btn-outline-infoto create a button that the user can press to submit the form.When there is an error in the form, we will need the program to run a conditional. For example, if there is an error in the username, the condition
{% if form.username.errors %}will be true. This will result in the error variable from the for loop to print.Copy the following code into
login.html</code></i></strong>:</h4>{% extends "layout.html" %} {% block content %} <div class="content-section"> <form method="POST" action=""> {{ form.hidden_tag() }} <fieldset class="form-group"> <legend class="border-bottom mb-4">Log In</legend> <div class="form-group"> {{ form.email.label(class="form-control-label") }} {% if form.email.errors %} {{ form.email(class="form-control form-control-lg is-invalid") }} <div class="invalid-feedback"> {% for error in form.email.errors %} <span>{{ error }}</span> {% endfor %} </div> {% else %} {{ form.email(class="form-control form-control-lg") }} {% endif %} </div> <div class="form-group"> {{ form.password.label(class="form-control-label") }} {% if form.password.errors %} {{ form.password(class="form-control form-control-lg is-invalid") }} <div class="invalid-feedback"> {% for error in form.password.errors %} <span>{{ error }}</span> {% endfor %} </div> {% else %} {{ form.password(class="form-control form-control-lg") }} {% endif %} </div> <div class="form-check"> {{ form.remember(class="form-check-input") }} {{ form.remember.label(class="form-check-label") }} </div> </fieldset> <div class="form-group"> {{ form.submit(class="btn btn-outline-info") }} </div> </form> </div> <div class="border-top pt-3"> </div> {% endblock content %}This file uses similar functions to the
register.htmlfile with slight variation.The legend is now “Log in” instead of “Signup”.
We do not need the confirm password form group.
We will need
div class=”form-check”for our “Remember Me” function which will allow the user to check a box if they would like to be rememberedLastly, lets create a template to allow users to easily update their account information.
Within
templates</code></i>, create a file namedaccount.html</code></i> andregister.html</code></i>.</h4>├── webpage │ ├── static │ │ ├── main.css │ ├── templates │ │ ├── account.html │ │ ├── feed.html │ │ ├── layout.html │ │ ├── login.html │ │ ├── register.html │ ├── main │ │ ├── __init__.py │ │ ├── routes.py │ ├── posts │ │ ├── __init__.py │ │ ├── routes.py │ ├── users │ │ ├── __init__.py │ │ ├── forms.py │ │ ├── routes.py │ │ ├── save_pics.py │ ├── __init__.py │ ├── models.py │ ├── site.db
Copy the following code into
account.html</code></i></strong>:</h4>{% extends "layout.html" %} {% block content %} <div class="content-section"> <div class="media"> <img class="rounded-circle account-img" src="{{ image_file }}"> <div class="media-body"> <h2 class="account-heading">{{ current_user.username }}</h2> <p class="text-secondary">{{ current_user.email }}</p> </div> </div> <form method="POST" action="" enctype="multipart/form-data"> {{ form.hidden_tag() }} <fieldset class="form-group"> <legend class="border-bottom mb-4">Account Info</legend> <div class="form-group"> {{ form.username.label(class="form-control-label") }} {% if form.username.errors %} {{ form.username(class="form-control form-control-lg is-invalid") }} <div class="invalid-feedback"> {% for error in form.username.errors %} <span>{{ error }}</span> {% endfor %} </div> {% else %} {{ form.username(class="form-control form-control-lg") }} {% endif %} </div> <div class="form-group"> {{ form.email.label(class="form-control-label") }} {% if form.email.errors %} {{ form.email(class="form-control form-control-lg is-invalid") }} <div class="invalid-feedback"> {% for error in form.email.errors %} <span>{{ error }}</span> {% endfor %} </div> {% else %} {{ form.email(class="form-control form-control-lg") }} {% endif %} </div> <div class="form-group"> {{ form.picture.label() }} {{ form.picture(class="form-control-file") }} {% if form.picture.errors %} {% for error in form.picture.errors %} <span class="text-danger">{{ error }}</span></br> {% endfor %} {% endif %} </div> </fieldset> <div class="form-group"> {{ form.submit(class="btn btn-outline-info") }} </div> </form> </div> {% endblock content %}This template uses the same bootstrap functions we have seen in the other templates.
</div> </div> </div>Creating Posts
In this section, we will work on the files within our
posts</code></i> module to allow users to create posts on the website. Lets add aforms.py</code></i> to this module.</h3>├── webpage │ ├── static │ │ ├── main.css │ ├── templates │ │ ├── account.html │ │ ├── feed.html │ │ ├── layout.html │ │ ├── login.html │ │ ├── register.html │ ├── main │ │ ├── __init__.py │ │ ├── routes.py │ ├── posts │ │ ├── __init__.py │ │ ├── forms.py │ │ ├── routes.py │ ├── users │ │ ├── __init__.py │ │ ├── forms.py │ │ ├── routes.py │ │ ├── save_pics.py │ ├── __init__.py │ ├── models.py │ ├── site.db
We will be using WTForms once again for our
posts</code></i>forms.py</code></i>.</h3>from flask_wtf import FlaskForm from wtforms import StringField, SubmitField, TextAreaField from wtforms.validators import DataRequired class PostForm(FlaskForm): title = StringField('Title', validators=[DataRequired()]) content = TextAreaField('Content', validators=[DataRequired()]) submit = SubmitField('Post')A title and content is required for our post form hence
validators=[DataRequired()].StringFieldis used for a shorter string of characters, perfect for the title.TextAreaFieldis for a larger amount of text, great for the content section. We will also be creating a submit button on this page when we create our templates.Now lets work on the
posts</code></i>routes.py</code></i> file.</h3>from flask import (render_template, url_for, flash, redirect, request, Blueprint) from flask_login import current_user, login_required from webpage import db from webpage.models import Post from webpage.posts.forms import PostForm posts = Blueprint('posts', __name__) @posts.route("/post/new", methods=['GET', 'POST']) @login_required def new_post(): form = PostForm() if form.validate_on_submit(): post = Post(title=form.title.data, content=form.content.data, author=current_user) db.session.add(post) db.session.commit() flash('Your post has been created!', 'success') return redirect(url_for('main.feed')) return render_template('create_post.html', title='New Post', form=form, legend='New Post')To create a new post, a user must be logged in. This function <code>@login_required</code> only allows logged in users to use the
/post/newroute. This route uses the form we just created and validates the user inputs before the post is added to the database.A
flashalert is shown when the post is created then the user is redirected to the feed page.Now we will be creating the
create_post.htmlfile this route will render from.Create a new template called
create_post.html</code></i>.</h4>├── webpage │ ├── static │ │ ├── main.css │ ├── templates │ │ ├── account.html │ │ ├── create_post.html │ │ ├── feed.html │ │ ├── layout.html │ │ ├── login.html │ │ ├── register.html │ ├── main │ │ ├── __init__.py │ │ ├── routes.py │ ├── posts │ │ ├── __init__.py │ │ ├── forms.py │ │ ├── routes.py │ ├── users │ │ ├── __init__.py │ │ ├── forms.py │ │ ├── routes.py │ │ ├── save_pics.py │ ├── __init__.py │ ├── models.py │ ├── site.db
Similar to the
register.html</code></i> andlogin.html</code></i> templates, thecreate_post.html</code></i> template will be formatting the form with textboxes and buttons where needed using the following code:</h4></div> </div> </div>{% extends "layout.html" %} {% block content %} <div class="content-section"> <form method="POST" action=""> {{ form.hidden_tag() }} <fieldset class="form-group"> <legend class="border-bottom mb-4">{{ legend }}</legend> <div class="form-group"> {{ form.title.label(class="form-control-label") }} {% if form.title.errors %} {{ form.title(class="form-control form-control-lg is-invalid") }} <div class="invalid-feedback"> {% for error in form.title.errors %} <span>{{ error }}</span> {% endfor %} </div> {% else %} {{ form.title(class="form-control form-control-lg") }} {% endif %} </div> <div class="form-group"> {{ form.content.label(class="form-control-label") }} {% if form.content.errors %} {{ form.content(class="form-control form-control-lg is-invalid") }} <div class="invalid-feedback"> {% for error in form.content.errors %} <span>{{ error }}</span> {% endfor %} </div> {% else %} {{ form.content(class="form-control form-control-lg") }} {% endif %} </div> </fieldset> <div class="form-group"> {{ form.submit(class="btn btn-outline-info") }} </div> </form> </div> {% endblock content %}Displaying Posts on the Feed Page
The feed page will display the posts created by the user. The code required to make this page will be in the
main</code></i> module.</h3>In the
main routes.py</code></i> file, copy the following code:</h4>from flask import render_template, Blueprint from webpage.models import Post main = Blueprint('main', __name__) @main.route("/") @main.route("/feed") def feed(): posts = Post.query.order_by(Post.date_posted.desc()) return render_template('feed.html', posts=posts)The
feedfunction searches for the posts within the database and orders them by the date posted. Newer posts will appear at the top of the feed. Earlier in the blog, we created thefeed.html</code></i> template in the Child Template section which this function will render from.</h4>
</div> </div> </div>We already created the template for our feed page in the Child Template.
Default Profile Picture
New users or users without a profile picture, will be automatically given a default profile picture.
Since profile pictures will not alter the code as the application is running, the file we will create to save these pictures will be in the
staticfolder. Name itprofile_pics. Within this file, upload a default image. Make sure this image is nameddefaultas shown below:├── webpage │ ├── static │ │ ├── main.css │ │ ├── profile_pics │ │ │ ├── default.jpg │ ├── templates │ │ ├── account.html │ │ ├── create_post.html │ │ ├── feed.html │ │ ├── layout.html │ │ ├── login.html │ │ ├── register.html │ ├── main │ │ ├── __init__.py │ │ ├── routes.py │ ├── posts │ │ ├── __init__.py │ │ ├── forms.py │ │ ├── routes.py │ ├── users │ │ ├── __init__.py │ │ ├── forms.py │ │ ├── routes.py │ │ ├── save_pics.py │ ├── __init__.py │ ├── models.py │ ├── site.db
Here is an example default image used in the website shown in this blog:
Running Your Application
While developing your program, you will need to run your code to ensure your application runs smoothly before it is deployed.
Create an
app.py</code></i> file outside of thewebpage</code></i> folder.</h4>├── webpage │ ├── static │ │ ├── main.css │ │ ├── profile_pics │ │ │ ├── default.jpg │ ├── templates │ │ ├── account.html │ │ ├── create_post.html │ │ ├── feed.html │ │ ├── layout.html │ │ ├── login.html │ │ ├── register.html │ ├── main │ │ ├── __init__.py │ │ ├── routes.py │ ├── posts │ │ ├── __init__.py │ │ ├── forms.py │ │ ├── routes.py │ ├── users │ │ ├── __init__.py │ │ ├── forms.py │ │ ├── routes.py │ │ ├── save_pics.py │ ├── __init__.py │ ├── models.py │ ├── site.db ├── app.py
Import the following code into this file:
from webpage import app if __name__ == '__main__': app.run(debug=True)The only purpose of the
ap.py</code></i> is to run the code. The file grabs theapp</code></i> variable fromwebpage __ init__.py</code></i> and runs it. Theapp</code></i> variable must be inside the__ init__.py</code></i> since this is where we are initializing the application.</h4>Launching Your Site
To run the application, type “python run.py” into the terminal. Click on the http://127.0.0.1:5000 link or paste it into your browser and your website should open!
</div> </div> </div>Deploying Your Website
In this section, I will be explaining how to deploy your Flask application onto the World Wide Web for free so that anyone with internet is able to access it. I will be using Heruko's "Free and Hobby" package, however, you can also upgrade to a paid package for more web functions.
Steps:
- Download Heroku Toolbelt CLI using this link
- Once installed, open your computer's command prompt terminal and make sure you are in your
FlaskWebPage</code></i> directory and that your virtual environment is active. This is what your terminal should say:
</li>(env) C:\Users\jenni\OneDrive\Desktop\FlaskWebPage>
- We will need to install gunicornpip install Gunicorn (a Python Web Server Gateway Interface (WSGI) HTTP server) and Psycopg 2 (a PostgreSQL database for Python). In the terminal type "pip install gunicorn".
(env) C:\Users\jenni\OneDrive\Desktop\FlaskWebPage>pip install gunicorn Once Gunicorn is installed, type "pip install psycopg2". (env) C:\Users\jenni\OneDrive\Desktop\FlaskWebPage>pip install psycopg2
Next we will have to create a file with the required packages that Heroku will need to download in order to use the different functions in our application. Create a new file called
requirements.txt</code></i>.</p>├── webpage │ ├── static │ │ ├── main.css │ │ ├── profile_pics │ │ │ ├── default.jpg │ ├── templates │ │ ├── account.html │ │ ├── create_post.html │ │ ├── feed.html │ │ ├── layout.html │ │ ├── login.html │ │ ├── register.html │ ├── main │ │ ├── __init__.py │ │ ├── routes.py │ ├── posts │ │ ├── __init__.py │ │ ├── forms.py │ │ ├── routes.py │ ├── users │ │ ├── __init__.py │ │ ├── forms.py │ │ ├── routes.py │ │ ├── save_pics.py │ ├── __init__.py │ ├── models.py │ ├── site.db ├── app.py ├── requirements.txt
Type "pip freeze" into the terminal:
(env) C:\Users\jenni\OneDrive\Desktop\FlaskWebPage>pip install psycopg2 Copy all the requirements into the
requirements.txt</code></i> file.</p> </blockquote> </li>Now we have to tell Heroku what kind of app we are running. Create a new file called "Procfile".
├── webpage │ ├── static │ │ ├── main.css │ │ ├── profile_pics │ │ │ ├── default.jpg │ ├── templates │ │ ├── account.html │ │ ├── create_post.html │ │ ├── feed.html │ │ ├── layout.html │ │ ├── login.html │ │ ├── register.html │ ├── main │ │ ├── __init__.py │ │ ├── routes.py │ ├── posts │ │ ├── __init__.py │ │ ├── forms.py │ │ ├── routes.py │ ├── users │ │ ├── __init__.py │ │ ├── forms.py │ │ ├── routes.py │ │ ├── save_pics.py │ ├── __init__.py │ ├── models.py │ ├── site.db ├── app.py ├── Procfile ├── requirements.txt
A Procfile tells Heroku what kind of app we are running. Type the following into the Procfile:
web: gunicorn app:appThis implies that the application is a web app using the gunicorn webserver and our app is called "app" since we named it app.py.
Create an account on the Heroku website, then type "heroku login" into the command prompt.
(env) C:\Users\jenni\OneDrive\Desktop\FlaskWebPage>heroku login This will open up the Heroku login page.
After logging in, we can now create a unique domain for our web server. Type "heroku create" then the name of what you want to call your app. For example, "heroku create flaskmediapage" was typed into the command prompt:
(env) C:\Users\jenni\OneDrive\Desktop\FlaskWebPage>heroku create flaskmediapage The terminal will inform you whether or not that domain name is taken. If the domain name is not taken, a URL to your website is created and should look similar to this: https://flaskmediapage.herokuapp.com/
The database we currently have is an SQLite database which was great during development of our app, however, is unable to run over a network. In order to deploy the app, we need to switch to a PostgreSQL database. To create a database with heroku, type "heroku addons:create heroku-postgresql:hobby-dev --app flasksocialmedia" into the terminal.
(env) C:\Users\jenni\OneDrive\Desktop\FlaskWebPage>heroku addons:create heroku-postgresql:hobby-dev --app flaskmediapage Ensure the last word of this command is the name of your app you chose from step 7. Now you have a free empty database.
Now we have to alter our code to make sure our application is using the PostgreSQL database. First we need to get the URL for database. Type this into your command prompt: "heroku config --app flaskmediapage".
(env) C:\Users\jenni\OneDrive\Desktop\FlaskWebPage>heroku config --app flaskmediapage This should create a URL similar to this: postgres://baeiyrmyxoecvu:c38f07af1eb3ad0da3e952189097972948241444bafe16ebfe86227aa089e8f1@ec2-52-206-182-219.compute-1.amazonaws.com:5432/des45gq4vda2q Now copy this URL and paste it into the
webpage __ init__.py</code></i> file, replacing the SQLite link we initially had. Add "ql" after "postgres" to indicate that it is an SQLAlchemy database Your code should look like this: ``` from flask import Flask from flask_sqlalchemy import SQLAlchemy from flask_bcrypt import Bcrypt from flask_login import LoginManager</p> </blockquote> </li> </ol>app = Flask(name) app.config['SECRET_KEY'] = '5791628bb0b13ce0c676dfde280ba245' app.config['SQLALCHEMY_DATABASE_URI'] = 'postgresql://baeiyrmyxoecvu:c38f07af1eb3ad0da3e952189097972948241444bafe16ebfe86227aa089e8f1@ec2-52-206-182-219.compute-1.amazonaws.com:5432/des45gq4vda2q' db = SQLAlchemy(app) bcrypt = Bcrypt(app) login_manager = LoginManager(app)
from webpage.users.routes import users from webpage.posts.routes import posts from webpage.main.routes import main
app.register_blueprint(users) app.register_blueprint(posts) app.register_blueprint(main)
10. We will be pushing our application onto Heroku using Github repositories. * Create a <code><i>.gitignore</code></i> file. ```bash ├── webpage │ ├── static │ │ ├── main.css │ │ ├── profile_pics │ │ │ ├── default.jpg │ ├── templates │ │ ├── account.html │ │ ├── create_post.html │ │ ├── feed.html │ │ ├── layout.html │ │ ├── login.html │ │ ├── register.html │ ├── main │ │ ├── __init__.py │ │ ├── routes.py │ ├── posts │ │ ├── __init__.py │ │ ├── forms.py │ │ ├── routes.py │ ├── users │ │ ├── __init__.py │ │ ├── forms.py │ │ ├── routes.py │ │ ├── save_pics.py │ ├── __init__.py │ ├── models.py │ ├── site.db ├── .gitignore ├── app.py ├── Procfile ├── requirements.txtPaste the following code:
# Byte-compiled / optimized / DLL files __pycache__/ *.py[cod] *$py.class # C extensions *.so # Distribution / packaging .Python build/ develop-eggs/ dist/ downloads/ eggs/ .eggs/ lib/ lib64/ parts/ sdist/ var/ wheels/ share/python-wheels/ *.egg-info/ .installed.cfg *.egg MANIFEST # PyInstaller # Usually these files are written by a python script from a template # before PyInstaller builds the exe, so as to inject date/other infos into it. *.manifest *.spec # Installer logs pip-log.txt pip-delete-this-directory.txt # Unit test / coverage reports htmlcov/ .tox/ .nox/ .coverage .coverage.* .cache nosetests.xml coverage.xml *.cover *.py,cover .hypothesis/ .pytest_cache/ cover/ # Translations *.mo *.pot # Django stuff: *.log local_settings.py db.sqlite3 db.sqlite3-journal # Flask stuff: instance/ .webassets-cache # Scrapy stuff: .scrapy # Sphinx documentation docs/_build/ # PyBuilder .pybuilder/ target/ # Jupyter Notebook .ipynb_checkpoints # IPython profile_default/ ipython_config.py # pyenv # For a library or package, you might want to ignore these files since the code is # intended to run in multiple environments; otherwise, check them in: # .python-version # pipenv # According to pypa/pipenv#598, it is recommended to include Pipfile.lock in version control. # However, in case of collaboration, if having platform-specific dependencies or dependencies # having no cross-platform support, pipenv may install dependencies that don't work, or not # install all needed dependencies. #Pipfile.lock # poetry # Similar to Pipfile.lock, it is generally recommended to include poetry.lock in version control. # This is especially recommended for binary packages to ensure reproducibility, and is more # commonly ignored for libraries. # https://python-poetry.org/docs/basic-usage/#commit-your-poetrylock-file-to-version-control #poetry.lock # pdm # Similar to Pipfile.lock, it is generally recommended to include pdm.lock in version control. #pdm.lock # pdm stores project-wide configurations in .pdm.toml, but it is recommended to not include it # in version control. # https://pdm.fming.dev/#use-with-ide .pdm.toml # PEP 582; used by e.g. github.com/David-OConnor/pyflow and github.com/pdm-project/pdm __pypackages__/ # Celery stuff celerybeat-schedule celerybeat.pid # SageMath parsed files *.sage.py # Environments .env .venv env/ venv/ ENV/ env.bak/ venv.bak/ # Spyder project settings .spyderproject .spyproject # Rope project settings .ropeproject # mkdocs documentation /site # mypy .mypy_cache/ .dmypy.json dmypy.json # Pyre type checker .pyre/ # pytype static type analyzer .pytype/ # Cython debug symbols cython_debug/ # PyCharm # JetBrains specific template is maintained in a separate JetBrains.gitignore that can # be found at https://github.com/github/gitignore/blob/main/Global/JetBrains.gitignore # and can be added to the global gitignore or merged into this file. For a more nuclear # option (not recommended) you can uncomment the following to ignore the entire idea folder. #.idea/This file tells Git which files to not commit.
- Type "git init" into the command prompt to initialize your repository.
(env) C:\Users\jenni\OneDrive\Desktop\FlaskWebPage>git init
- "git add -A" collects all the files.
(env) C:\Users\jenni\OneDrive\Desktop\FlaskWebPage>git add -A
- "git commit -m "initial commit"" commits the files into the repository.
(env) C:\Users\jenni\OneDrive\Desktop\FlaskWebPage>git commit -m "initial commit"
- "git push heroku master" pushes the repository onto Heroku.
(env) C:\Users\jenni\OneDrive\Desktop\FlaskWebPage>git push heroku master
- The last step is to migrate the PostgreSQL database, similar to what we did with SQLite.
- Type "heroku run python" in the command prompt.
(env) C:\Users\jenni\OneDrive\Desktop\FlaskWebPage>heroku run python
Now we will import our database:
>>> from webpage import db
Then we will create the database:>>>> db.create_all()
- Exit out of the python terminal:
>>> exit()
Now you should have your own fully functioning social media page!
You can paste the URL you are given from step 7 into your browser or use the following command to open your web server:>(env) C:\Users\jenni\OneDrive\Desktop\FlaskWebPage>heroku open
</div> </div> </div></div>Sources
- Schafer, C. (2018, May 4). Python flask tutorial: Full-featured web app part 1 - getting started. YouTube. Retrieved June 26, 2022, from https://www.youtube.com/watch?v=MwZwr5Tvyxo&list=PL-osiE80TeTs4UjLw5MM6OjgkjFeUxCYH
- Walker, R. (n.d.). Education at bat: Seven principles for educators. Harvard Graduate School of Education. Retrieved June 26, 2022, from https://www.gse.harvard.edu/news/uk/09/01/education-bat-seven-principles-educators
- Mark Otto, J. T. (n.d.). Bootstrap. Bootstrap · The most popular HTML, CSS, and JS library in the world. Retrieved June 26, 2022, from https://getbootstrap.com/
- Real Python. (2021, February 6). Use a flask blueprint to architect your applications. Real Python. Retrieved June 27, 2022, from https://realpython.com/flask-blueprint/
- Jemastock. (2019, April 17). Thumb up icon vector image on vectorstock. VectorStock. Retrieved June 27, 2022, from https://www.vectorstock.com/royalty-free-vector/thumb-up-icon-vector-24957601
- CoreyMSchafer. (n.d.). Code_snippets/python/flask_blog at master · coreymschafer/code_snippets. GitHub. Retrieved June 27, 2022, from https://github.com/CoreyMSchafer/code_snippets/tree/master/Python/Flask_Blog
- Github. (2021, December 11). Gitignore/jetbrains.gitignore at main · github/gitignore. GitHub. Retrieved June 27, 2022, from https://github.com/github/gitignore/blob/main/Global/JetBrains.gitignore
- Codemy.com. (2022, January 14). Deploy flask app with database on Heroku for webhosting - flask fridays #39. YouTube. Retrieved June 27, 2022, from https://www.youtube.com/watch?v=SiCAIRc0pEI
- We will need to install gunicornpip install Gunicorn (a Python Web Server Gateway Interface (WSGI) HTTP server) and Psycopg 2 (a PostgreSQL database for Python). In the terminal type "pip install gunicorn".