From Rest API to GraphQL
A simple beginner's guide to transform a web application from RESTful to GraphQL.


Goals
- Build a simple web application that sorts different genres of music using Rest API and Flask.
- Set up basic Flask web-server
- Set up a database model using SCLAlchemy.
- Manipulate the database.
- Implement the above using graphQL.
How the project relates to the Digital Engineering curriculum
In the scope of this project, we are going to focus on the fourth principle Playing out of town from Making Learning Whole: Education at Bat: Seven Principles for Educators. David Perkins focuses on the learner's ability to take their skills to the next level. He encourages learners to develop transferrable knowledge that can be used flexibly in other fields. For instance,
- Students already know how to use Flask to develop a web server.
- Students have worked with a different type of SQL (ORM) to manipulate databases.
- Students have a former knowledge of HTTP methods.
Students are encouraged to discover how to use their previous knowledge and skills to achieve a similar output with a different approach. By the end of this article, students will:
- Have an introductory knowledge of a new query language.
- Learn the basic syntax of that language.
- Learn how to create and query data.
Brief introduction
API stands for Application Programming Interface, A set of definitions and protocols for integrating web applications. In other words, it is a setup that allows two pieces of software to connect and communicate with each other. We know that every software differs from one another. When the two pieces of software communicate, one software will deal with whatever in the backend which is the main server. The other software will make requests to the server to retrieve data in the frontend. Rest API stands for Representational State Transfer. As the name implies, this type of API helps transfer data over the internet. This allows users to only view specific things from the backend. GraphQL is a declarative query programming language for APIs and a server-side runtime. GraphQL is designed to make APIs fast, flexible and developer-friendly. It simply gives the client the privelage of to ask for exactly what they need and only what the need. This makes it easier when dealing with more complex databases that contain huge amounts of data. GraphQL is used to query data from any number of sources. Thankfully, both Rest APIs and graphQL pair with python nicely. In this project, we will try to build an application to store information about music genres using Rest API and then we will try to implement it with graphQL. This example is inspired from Caleb Curry where you can find it here.
Setting up a basic Rest API
Let us start by creating our own Rest API with python. We will use Flask as our framework. Flask is highly recommended since it is a simpler setup than other frameworks like Django and Ruby. However, any other framework will do the job. Flask runs on localhost:5000. We are going to install the dependencies that we need to be able to work with the framework in our preferred environment. As a side note, working in a virtual environment is highly recommended as it isolates the installations. I will assume that you already know how to setup a virtual environment and will dive straight into the development of the flask app. Write the following in the terminal to install the dependencies:
# pip install flask-sqlalchemy
# pip install requests
Create a file and name it RestApp.py in which we can write our initial code. Start by initializing the flask app. For now, we will return a simple string. This will give an HTTP response message of 200 OK, meaning the server is running without any problems. To familiarize yourself with more response codes, you can have a look at this Wikipedia Article.
from flask import Flask

app = Flask(__name__)

@app.route('/')
def index():
    return "Music Genres!"

if __name__ == "__main__":
    app.run()

In the terminal, we would like to export the flask app to be able to run it. We have to do the following every time we want to run our flask app.
# SET FLASK_ENV=development
# flask run
Now we will create a class to store music genres inherited from an SQLAlchemy database model. The attribute unique here is used if we want every name to be different, and the attribute nullable is used if we do not want any columns in our table to be empty. The __repr__ method represents the class's object as a readable string.
class Music(db.Model):
    id = db.Column(db.Integer, primary_key=True)
    name = db.Column(db.String, unique=True, nullable=False)
    description = db.Column(db.String(120))

    def __repr__(self):
        return f"{self.name} - {self.description}"
SQLAlchemy is a library that allows communication between python programs and relational databases. It is used as a tool to convert python classes to data tables. If we go back to the terminal and try to import the database, we will find that the database has not yet been defined. So, we need to connect to the database using a Database URI. Thus, The database will be an instance of SQLite in the same directory.
from flask_sqlalchemy import SQLAlchemy

app.config['SQLALCHEMY_DATABASE_URI'] = 'sqlite:///music.db'
db = SQLAlchemy(app)
The next step is to import the database from our application to create our desired data tables in the terminal. This will create a music.db file in our repository. We will create our first entry in the database. Each piece of data is treated as an object of the class that we created. Thus, creating data is creating instances of the class Music and assigning it parameters to describe the data. Because we used the __repr__ method, we can type music, and the list of music genres will be listed in a string format. Note that it is important to import the class in the fourth line, or else the instance Music will not be defined. To test that we added a data row successfully, we can type in music into the terminal, and it will give us the data that we entered.
# from RestApp import db
# db.create_all()
# from RestApp import Music
# db.session.add(music)
# db.session.commit()
To add another music genre to the database, type the following:
# db.session.commit()
# Music.query.all()
If we want to use our data with the server, we must go back to the route(/music). Here we will implement a JSON list and iterate through the music genres. This way, the output will be in the form of a list of dictionaries containing the data. We can go back to the website and reload it; the data will be displayed with one key, which is music and a pair of a list of dictionaries (i.e. name, description).
@app.route("/music")
def get_music():
    music = Music.query.all()

    output = []
    for music in Music:
        music_info = {'name': music.name, 'description': music.description}

        output.append(music_info)
If we want to grab a specific genre, an effortless way would be fetching it by its id. So to do this, we develop a new route. In this route, we will implement a new function and pass the id of a specific music genre because we are using dictionaries to store the data.

@app.route('/music/<id>')
def get_music_id(id):
    music = Music.query.get_or_404(id)         # this will either fetch the genre with a specific id or return a 404 error
    return {"name": music.name, "description":music.description}
Let's test this out by going back to the browser and typing localhost5000/music/1.

Now try to fetch a music genre with id 3. The result would be a 'Not Found' error as we have not yet entered the third genre into our database.

Additional HTTP Methods
When working with REST APIs, HTTP methods are usually used to manipulate our database. The most well-known HTTP methods are:
POST: creates new resources in the databaseGET: retrieves a representation of an existing resource in the databasePUT: updates a resource in the databaseDELETE: removes a resource from the database
These methods are known as "CRUD" which stands for create, read, update and delete respectively.
Introduction to GraphQL
We introduced the query language GraphQL, but the question is, what makes GraphQL more unique, and how does it differ from a REST API? GraphQL was developed internally by Facebook in 2012 before being publicly released in 2015. Facebook developed that language to solve a problem that REST APIs do not address; the need for APIs to be able to adapt to the rapid changes required by the frontend.
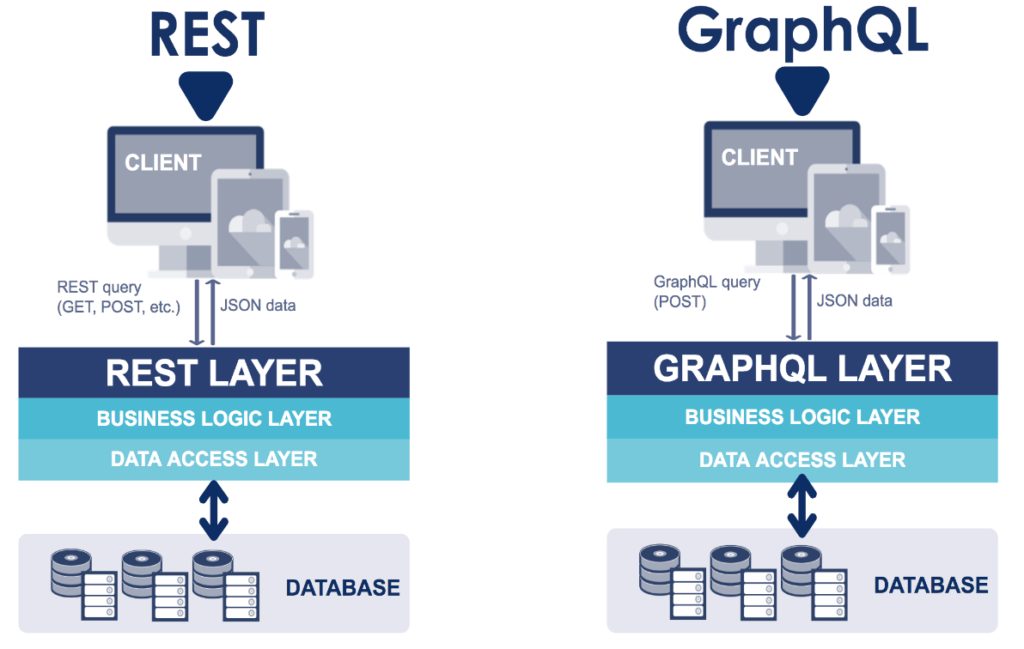
REST APIs are modelled as resources. We provide various endpoints to access particular data and define which HTTP methods are used at each endpoint. On the other hand, GraphQL models the API as a graph. While the backend is still responsible for access controls and deals with how data gets passed between the frontend and the database, GraphQL removes the backend requirement of needing to create specific endpoints for each type of data needed and generates only one endpoint across all objects. It lets developers construct requests that pull data from multiple data resources in a single API call. The GraphQL special Schema Definition Language (SDL) allows for defining the types and fields of each type of data. The types defined in a GraphQL schema are treated as nodes. The client can then make queries at a specific endpoint to access data at that particular node of interest to get the specific data it wants. For more information, look at the official GraphQL documentaion. The main advantages of querying data with GraphQL are:
- Reduces web-app development efforts.
- Reduces bandwidth: querying only what we need and only what we need
- Reduces the number of requests
Requirements
As mentioned previously, flask is just a framework that makes it easier to build and configure web applications, and Flask_SQLAlchemy is an extension used for flask that allows us to interact with our SQL database using SQLAlchemy. Introducing Graphene, it is a library that helps us implement and integrate GraphQL APIs in python. Several other libraries can be used to integrate GraphQL APIs (for example, Ariadne). However, for this project, we will work with Graphene.
What is the difference between Ariadne and Graphene?
The main difference between the two is that Ariadne uses a schema-first approach while Graphene uses a code-first approach. What does this mean? A schema-first approach is about writing the schema first and then implementing the code to satisfy the definitions of the schema. In a code_first approach, we start by coding the resolvers which are functions connecting the schema types to the backend. As a result, the schema is generated based on our code. According to Prisma's Nikolas Burk, developers usually prefer Graphene over Ariadne because there are no features supported by a schema-first approach that are not supported by a code-first approach.
Developing our GraphQL Alternative
In a different module which we will call graphQL_App.py, we will start adding to the code and integrate the graphQL method step by step. First of all, we need to install the library Graphene. Graphene comes with built-in support for SQLAlchemy. We will also need the GraphQL extension for Flask to be able to view the schema through HTTP. Note that we already installed flask and flask-sqlalchemy, so there is no need to redo the installation. Thus, we will go ahead and write the following commands in the terminal to install the remaining dependencies:
# pip install graphene-sqlalchemy
# pip install flask_graphql
Now that we have installed the dependencies to work with GraphQL, we will take the code in RestApp.py and adjust it. To recap, the full code should look like this:
from flask import Flask
from flask_sqlalchemy import SQLAlchemy


app = Flask(__name__)

app.config['SQLALCHEMY_DATABASE_URI'] = 'sqlite:///music.db'
db = SQLAlchemy(app)


class Music(db.Model):
    id = db.Column(db.Integer, primary_key=True)
    name = db.Column(db.String, unique=True, nullable=False)
    description = db.Column(db.String(120))

    def __repr__(self):
        return f"{self.name} - {self.description}"


@app.route('/')
def index():
    return "<h1>Music Genres!</h>"


@app.route("/music")
def get_music():
    music = Music.query.all()

    output = []
    for genre in music :
        music_info = {'name': genre.name, 'description': genre.description}

        output.append(music_info)

    return {"music": output}


@app.route('/music/<id>')
def get_music_id(id):
    music = Music.query.get_or_404(id)         # this will either fetch the drink with a specific id or return a 404 error
    return {"name": music.name, "description":music.description}


if __name__ == "__main__":
    app.run()
Let's start doing the required imports in our code:
from flask import Flask
from flask_sqlalchemy import SQLAlchemy
import graphene
from graphene_sqlalchemy import SQLAlchemyObjectType, SQLAlchemyConnectionField
from flask_graphql import GraphQLView
Proceed with creating the flask application, creating a database model, and configuring the model with Graphene. In our case, we already created a database model music.db, so there is no need to create another one.
app = Flask(__name__)

app.config['SQLALCHEMY_DATABASE_URI'] = 'sqlite:///music.db'
db = SQLAlchemy(app)


class Music(db.Model):
    id = db.Column(db.Integer, primary_key=True)
    name = db.Column(db.String, unique=True, nullable=False)
    description = db.Column(db.String(120))

    def __repr__(self):
        return f"{self.name} - {self.description}"

####################################################
class MusicObject(SQLAlchemyObjectType):
    class Meta:
       model = Music
       interfaces = (graphene.relay.Node, )
####################################################

@app.route('/')
def index():
    return "<h1>Music Genres!</h>"


if __name__ == "__main__":
    app.run()
class Query(graphene.ObjectType):
    node = graphene.relay.Node.Field()
    all_music = SQLAlchemyConnectionField(MusicObject)
A Mutation class:
class CreateMusic(graphene.Mutation):

    class Arguments:
        name = graphene.String(required=True)
        description = graphene.String(required=True)

    music = graphene.Field(lambda: MusicObject)

    def mutate(self, info, name, description):    # method to be called when writing data
        music = Music(
            name = name,
            description = description
        )
        if music:
            db.session.add(music)
            db.session.commit()

        return CreateMusic(music=music)


# Mutation class
class Mutation(graphene.ObjectType):
    create_music = CreateMusic.Field()
After writing our code, we can go ahead and define our schema:
schema = graphene.Schema(query=Query, mutation=Mutation)
The final part is exposing the GraphQL view using the function view_func.
app.add_url_rule(
    '/graphql',
    view_func=GraphQLView.as_view(
        'graphql',
        schema=schema,
        graphiql=True
    )
)
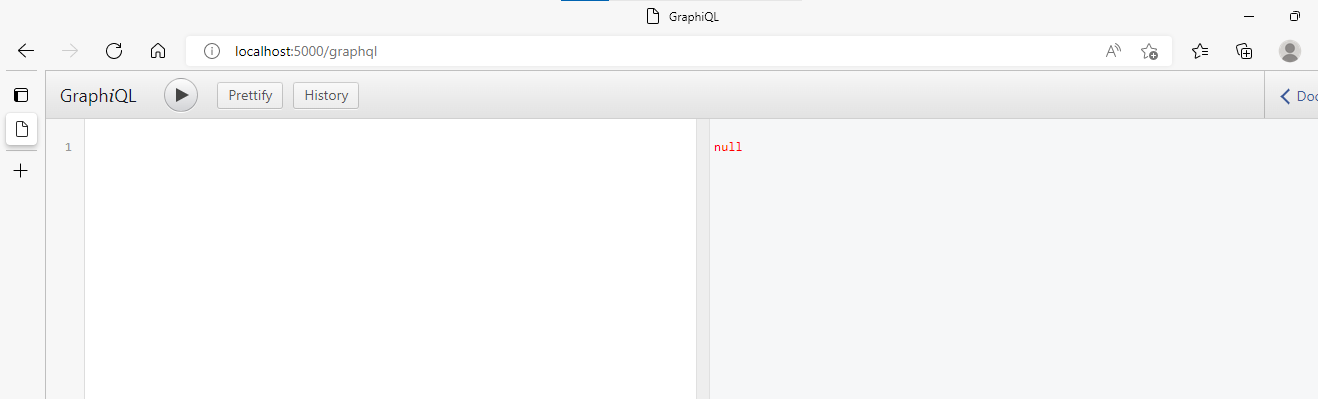
If we run our code by typing python graphQL_App.py in the terminal and then go back to the browser to type localhost:5000/graphql in the search bar, the following view will appear:
Querying the database
Now we can make queries to our database through the GraphiQL integrated developement environment (IDE). A Query is the equivalent to a GET request when working with REST APIs. We can request data in a Query and receive data in a Response containing only the requested data. Looking at the example below, the response on the right has the same shape as the query itself, making it easier to identify the fields that are returned.
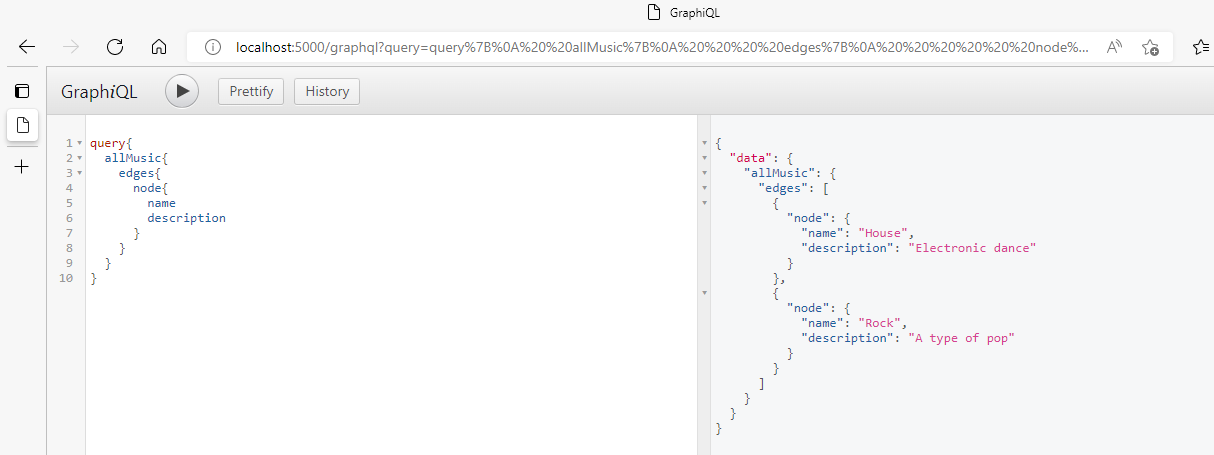
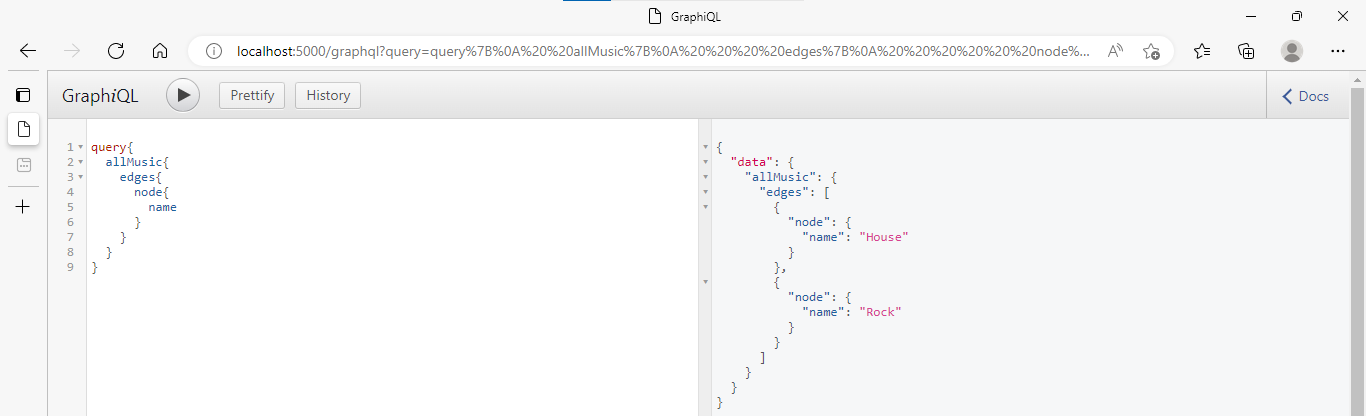
We can even be more specific and request only the names of the genres.
Modifying the database
GraphQL Queries can be implemented in a sense to cause modifications to the data in the server. By convention, any operation that causes a data write in GraphQL is called a mutation. Mutations are the equivalent of the POST, PUT, and DELETE methods. In this example, the mutation class will refer to another class, CreateMusic. Refer to the code under A mutation class. Let's test our mutation class by creating a new entry.
mutation{
  createMusic(name:"Jazz", description:"propulsive syncopated rhythms"){
    music{
      name
      description
    }
  }
}
Conclusion
Congratulations on reaching this far! This mini-tutorial introduced some basic concepts about GraphQL and how it compares to REST APIs. We demonstrated how to build a simple web application, and allowing the client to provide custom data using URL parameters and interactivity with databases using SQLAlchemy. As a next step, a good recommendation would be to work on projects involving multiple relational databases and discover how to query them using GraphQL.
References
Using GraphQL with python – A complete guide. Apollo GraphQL Blog. (n.d.). Retrieved July 1, 2022, from
https://www.apollographql.com/blog/graphql/python/complete-api-guide/
Gwalugano, K. (2021, December 6). Build a graphql API with Python, Flask, and Ariadne. LogRocket Blog. Retrieved July 1, 2022, from
https://blog.logrocket.com/build-graphql-api-python-flask-ariadne/
Turning a rest API into graphql using StepZen: Stepzen Blog. StepZen. (n.d.). Retrieved July 1, 2022, from
https://stepzen.com/blog/rest-to-graphql
Ansurkar, A. (2020, June 4). Getting started with graphql and Flask. Medium. Retrieved July 1, 2022, from
https://python.plainenglish.io/getting-started-with-graphql-and-flask-13a99513e764
Dyouri, A. (2020, April 16). How to make a web application using flask in python 3. DigitalOcean. Retrieved July 1, 2022, from
https://www.digitalocean.com/community/tutorials/how-to-make-a-web-application-using-flask-in-python-3
Getting started. Graphene. (n.d.). Retrieved July 1, 2022, from
https://docs.graphene-python.org/en/latest/quickstart/
Bruno KrebsR&D Content ArchitectI am passionate about developing highly scalable. (2017, November 9). SQLAlchemy orm tutorial for python developers. Auth0. Retrieved July 3, 2022, from
https://auth0.com/blog/sqlalchemy-orm-tutorial-for-python-developers/
Queries and mutations. GraphQL. (n.d.). Retrieved July 3, 2022, from
https://graphql.org/learn/queries/
Dechalert, A. (2020). What's the difference between REST and GraphQl . Retrieved July 4, 2022, from
https://www.tabnine.com/blog/rest-api-vs-graphql/.