Intro to Pygame
Pygame basics for your first video game!


- Playing the Whole Game
- Try This Out!
- Why Pygame?
- Installing Pygame
- The Basic Framework
- Coordinates in Pygame
- Setting the Window Title and Icon
- Event Listeners
- Surfaces
- Rectangles
- Adding an Image to the Screen
- Movement
- Obstacles
- Interactive Objects
- Text Handling
- Going Forward
- References and Companion Files
Playing the Whole Game
Getting started with an unfamiliar library can be a daunting task - especially with one as large as pygame. So let's start by using the first principle of David Perkins' Seven Principles of Teaching: Play the Whole Game. Try out the game below, then come back to this page. All of the elements you see in the game are broken down here.
Try This Out!
Here is a simple pygame example that uses the concepts below:
- Video Game Playthrough (may require downloading): simple_pygame_playthrough.mp4
- Video Game Code: simple_pygame.py
Why Pygame?
Pygame is a tool for developing video games using python. The library allows you to do a few things that are not otherwise easy to do:
- Open a graphical user interface (GUI) window
- Draw objects, shapes, and text in the window
- Get player input without stopping the game (which is what would happen if
input()was used)
Pygame is best for simple games, and is good for learning the logic behind an event loop.
Installing Pygame
For installing on a variety of devices, see the official Getting Started wiki here.
For Windows, enter the following in a command prompt:
python -m pip install pygame
To test that it works correctly, try:
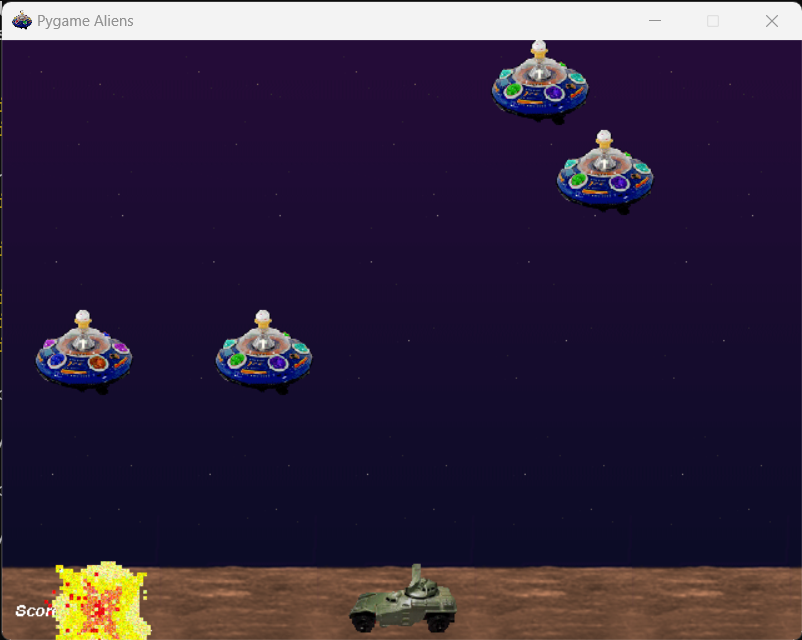
python -m pygame.examples.aliens
If pygame is installed properly, it should open an aliens game that looks like this:
To test that a python file will run correctly, create a .py file and run:
import pygame

print(pygame.ver)
The Basic Framework
All pygame applications need this basic structure to run.
The code below has been modified from Python Simplified's video Create a Simple Video Game with Pygame - Step by Step Tutorial for Python Beginners!.
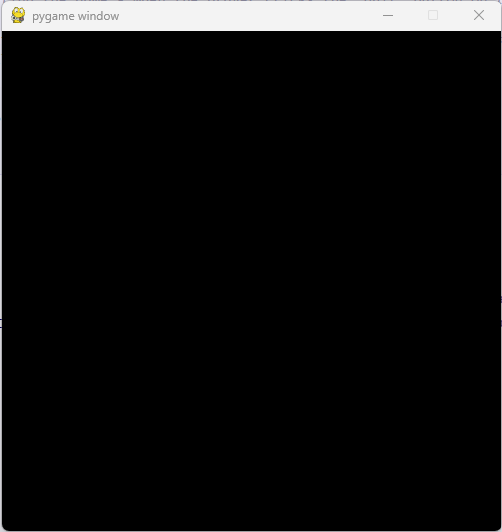
# Running this code will open an empty pygame window. Clicking the "quit" button on the window closes the application.

# 1. Import libraries
import pygame
from pygame.locals import *

# 2. Initialize all imported pygame modules - this will raise exceptions if it fails
pygame.init()

# 3. Global variable used with the event listener in step 7
running = True

# 4. Clock used for controlling frame rate
clock = pygame.time.Clock()

# 5. Set display window size - the window is pygame's built-in GUI
screen = pygame.display.set_mode((700,500))

# 6. Event loop - all motions and events that happen as the game runs are inside this loop
while running:

    # 7. Event listener for quitting the game - when the player clicks the "quit" button on the window, "running" is set to False and the application closes
    for event in pygame.event.get():
        if event.type == QUIT:
            running = False

# 8. Set the frame rate to 60 FPS (frames per second) - a constant frame rate helps the game run smoother
    clock.tick(60)

# 9. Close the application
pygame.quit()
The empty window looks like this:
pygame.display.set_caption("My Game")
The default pygame icon can be changed into any image using a surface (see the section on Surfaces below):
# a pygame.Surface object that stores an image
surface = pygame.Surface()
# change the display icon
pygame.display.set_icon(surface)
Event Listeners
Event listeners wait to perform an action until a certain type of event has occurred, usually player input. For example, when the player presses the left arrow key, move a character left. The general format is:
Check that a certain type of event has occurred --> Do something.
In the basic framework, we used an event listener to quit the application when the player closes the window.
running = True                          # flag to control whether or not the game will run
pygame.init()                           # initialize the window
while running:
    for event in pygame.event.get():    # All events of the game are stored in the events module. We need to "get" them to look at them.
        if event.type == QUIT:          # Checking if a "QUIT" type of event has occured, a.k.a. the player clicking the "quit" button
            running = False
pygame.quit()                           # close the window
Surfaces
A pygame.Surface object is used for representing images in the game. For example, a surface can be an icon that the player controls, or the background of the game. Surfaces can only be moved using the coordinates of its top left corner.
There are two types of surfaces:
- Display Surface: the window of the game. It is always visible, and there is only one. The pygame application will not run without one.
# create a display surface with width=700 and height=500
screen = pygame.display.set_mode((700,500))
- Regular Surface: a surface that may or may not be visible on the screen. There can be an unlimited number of them.
# create a surface of width=5, height=10
regular_surf = pygame.surface((5, 10))
# create a surface from an image import
img_surf = pygame.image.load('intro_to_pygame_images/image.png')
Converting to Pygame-Friendly Format
Surface.convert() and Surface.convert_alpha() are used to turn an image into a format that is easier for pygame to handle. Note that convert() makes transparent pixels appear black or white when the surface is added to the screen. To keep transparent pixels, use convert_alpha().
The pygame modules and display screen must be initialized before these methods are called.
# initialize modules and screen
pygame.init()
screen = pygame.display.set_mode((700,500))

# create a surface from an image import and use convert()
img_surf = pygame.image.load('intro_to_pygame_images/image.png').convert()

# OR create surface and use convert_alpha()
img_surf = pygame.image.load('intro_to_pygame_images/image.png').convert_alpha()

# close application
pygame.quit()
# get dimensions of image.png

# initialize modules and screen
pygame.init()
screen = pygame.display.set_mode((700,500))

# create a surface from an image import
img_surf = pygame.image.load('intro_to_pygame_images/image.png')

# get dimensions
width = img_surf.get_width()
height = img_surf.get_height()
print(width, height)

# close application
pygame.quit()
# resize img_surf to width=60, height=60
img_surf_small = pygame.transform.scale(img_surf, (60,60))
# check that the resizing worked - get new dimensions of img_surf_small

# initialize modules and screen
pygame.init()

# get dimensions
width = img_surf_small.get_width()
height = img_surf_small.get_height()
print(width, height)

# close application
pygame.quit()
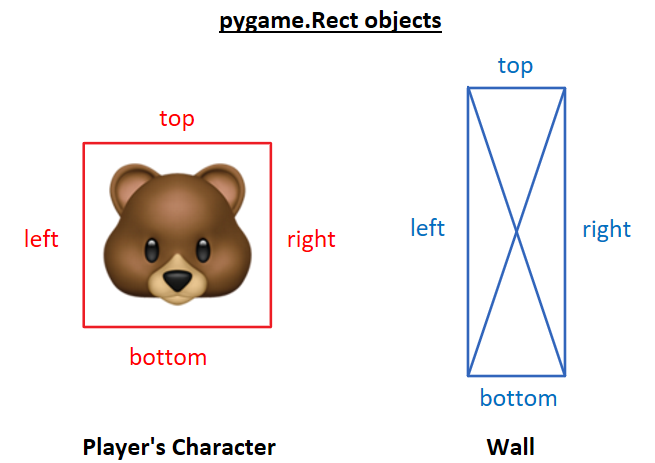
Rectangles
A pygame.Rect object is used to store rectangular coordinates (location data). Unlike surfaces, which can only be moved using the top left corner, rectangles can be moved using a variety of attributes:
x,y
top, left, bottom, right
topleft, bottomleft, topright, bottomright
midtop, midleft, midbottom, midright
center, centerx, centery
size, width, height
w,h
To create a rectangle, use pygame.Rect(left, top, width, height).
# create a rectangle with the top left corner located at x=100, y=200, and with width=10 and height=20
rect = pygame.Rect(100, 200, 10, 20)
# use a keyword argument to create a rectangle with its center located at x=100, y=200, and with width=10 and height=20
rect = pygame.Rect(center=(100,200), width=10, height=20)
Drawing a Rectangle on the Screen
Use pygame.draw.rect(Surface, (R,G,B), Rect) to draw a rectangle on the display surface. The pygame modules and display screen must be initialized before creating the rectangle, and pygame.display.update() must be called after draw() in order for the rectangle to appear on the screen.
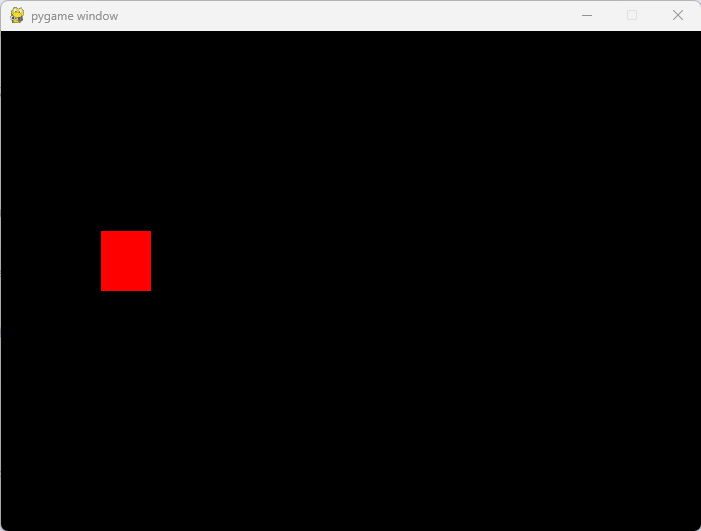
# draw a red rectangle on the screen

# initialize modules, global variable, clock and screen
pygame.init()
running = True
clock = pygame.time.Clock()
screen = pygame.display.set_mode((700,500))

# create a rectangle with the top left corner located at x=100, y=200, and with width=50 and height=60
rect = pygame.Rect(100, 200, 50, 60)

# event loop
while running:
    # event listener for quitting the game
    for event in pygame.event.get():
        if event.type == QUIT:
            running = False

    # draw rectangle on screen in red (RED=255, GREEN=0, BLUE=0)
    pygame.draw.rect(screen, (255, 0, 0), rect)

    # update the display - required for the rectangle to appear
    pygame.display.update()

    # set frame rate
    clock.tick(60)

# close application
pygame.quit()
The result:
# create a surface from an image import - Surface stores image data
img_surf = pygame.image.load('intro_to_pygame_images/image.png')
# create a rectangle from the surface - Rect stores location data
img_rect = img_surf.get_rect()
# create a rectangle from a surface, located 200 pixels from the left and 400 pixels from the top of the screen
img_rect = img_surf.get_rect((200,400))
Adding an Image to the Screen
The Surface.blit() method places an image onto the screen of the pygame application. It requires:
- A display surface
- An image surface
- A destination, either a rectangle or coordinates
This method must be done inside of the event loop.
The order of Surface.blit() calls is important - images will be placed on the screen in the order that they are called.
# place an image on the screen at the location of its rectangle
screen.blit(img_surf, img_rect)
# place an image on the screen so that its top left corner is at x=100, y=200
screen.blit(img_surf, (100,200))
Movement
Here we combine event listeners, surfaces and rectangles to move a player's icon around a screen.
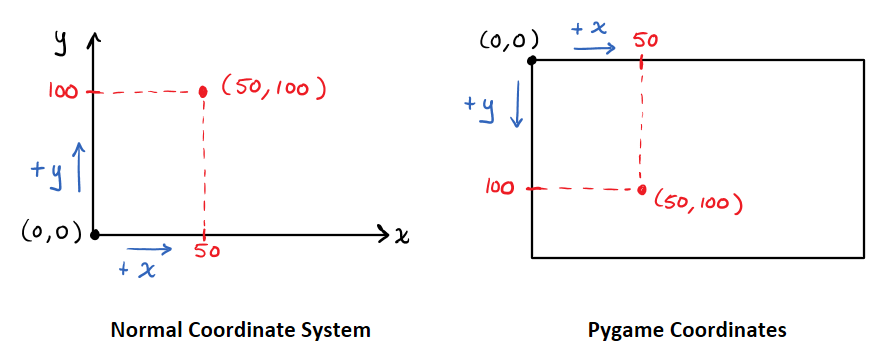
Let's use the arrow keys to control the icon. We need an event listener for each arrow key, and a change in x and y as the result. Remember that pygame coordinates work differently than normal cartesian coordinates.
Note that pygame.display.update() must be called in the event loop to show the player's new position on the screen.
See the example below.
import pygame
from pygame.locals import *

# initialize modules and window
pygame.init()
running = True
clock = pygame.time.Clock()
screen = pygame.display.set_mode((500,500))

# player's character - a bear icon
bear_surf = pygame.image.load('intro_to_pygame_images/brown_bear.png').convert_alpha()
bear_loc = bear_surf.get_rect()

# event loop
while running:
    # event listeners
    for event in pygame.event.get():

        # user quitting game
        if event.type == QUIT:
            running = False

        # movements for player icon - uses arrow keys and movement occurs every key press
        # KEYDOWN is the downward press of any key on the keyboard
        # move() specifies the change in x and y when the key is pressed
        if event.type == KEYDOWN:
            if event.key == K_LEFT:
                bear_loc = bear_loc.move([-10, 0])
            if event.key == K_RIGHT:
                bear_loc = bear_loc.move([10, 0])
            if event.key == K_UP:
                bear_loc = bear_loc.move([0, -10])
            if event.key == K_DOWN:
                bear_loc = bear_loc.move([0, 10])

    # add bear image to screen
    screen.blit(bear_surf, bear_loc)

    # update the display surface
    pygame.display.update()

    clock.tick(60)

pygame.quit()
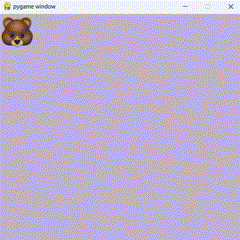
The result:
![]()
There are three problems with the result:
| Problem | Solution |
|---|---|
| 1. When the icon is moved around the screen, old images are still visible. | In the event loop, use pygame.draw.rect() to draw a background on the screen before the icon is added. For every iteration of the event loop, the background will cover all previous icons. Simply changing the colour of the display screen using fill() would not have this effect. |
| 2. The icon only moves when a key is pressed, but not when keys are held down. | Use pygame.key.get_pressed() to retrieve the current state of all keys, so that the icon continues to move when arrow keys are held down. |
| 3. The icon can move beyond the visible window. | Use clamp_ip() to confine the icon's Rect object (bear_loc) to the screen's Rect object. Note that screen is a Surface object, so we need to call get_rect() on it first. |
import pygame
from pygame.locals import *

# initialize modules and window
pygame.init()
running = True
clock = pygame.time.Clock()
screen = pygame.display.set_mode((500,500))

# player's character - a bear icon
bear_surf = pygame.image.load('intro_to_pygame_images/brown_bear.png').convert_alpha()
bear_loc = bear_surf.get_rect()

# event loop
while running:
    # event listeners
    for event in pygame.event.get():

        # user quitting game
        if event.type == QUIT:
            running = False

    # movements for player icon
    # if a key is held, the movement continues without stopping
    keys = pygame.key.get_pressed()
    if keys[pygame.K_LEFT]:
        bear_loc = bear_loc.move([-10, 0])
    if keys[pygame.K_RIGHT]:
        bear_loc = bear_loc.move([10, 0])
    if keys[pygame.K_UP]:
        bear_loc = bear_loc.move([0, -10])
    if keys[pygame.K_DOWN]:
        bear_loc = bear_loc.move([0, 10])

    # add background - using a rectangle instead of using screen.fill() ensures old images aren't left behind as an object moves
    pygame.draw.rect(screen, (191,180,214), pygame.Rect(0,0,800,800))   # surface, colour, Rectangle(left coord, top coord, width, height)

    # get rectangle of display screen
    screen_rect = screen.get_rect()

    # confine the player's icon to the rectangle of the display screen
    bear_loc.clamp_ip(screen_rect)

    # add bear image to screen
    screen.blit(bear_surf, bear_loc)

    # update the display surface
    pygame.display.update()

    clock.tick(60)

pygame.quit()
The result:
Obstacles
Let's make some obstacles that the player cannot cross, such as a wall. Do this using a pygame.Rect object. Collisions will be handled using the sides of the player rectangle and the wall rectangle.
In the event loop, use event listeners to check if a movement will cause a collision. If not, allow the movement to occur.
Create player's character and wall:
# player's character - bear icon
bear_surf = pygame.image.load('intro_to_pygame_images/brown_bear.png').convert_alpha()
bear_loc = bear_surf.get_rect()

# obstacle - wall
wall = pygame.Rect((200,200),(10,100))
In the event loop, check that movements are allowed:
keys = pygame.key.get_pressed()

if keys[pygame.K_LEFT]:

    # Left movement occurs UNLESS...
    # player is within y-range of wall...........................and player is left of wall.....and player will collide with wall
    if bear_loc.bottom > wall.top and bear_loc.top < wall.bottom and bear_loc.left >= wall.right and bear_loc.left - 10 < wall.right: pass
    # otherwise, move left
    else: bear_loc = bear_loc.move([-10, 0])

if keys[pygame.K_RIGHT]:

    # Right movement occurs UNLESS...
    # player is within y-range of wall...........................and player is right of wall.....and player will collide with wall
    if bear_loc.bottom > wall.top and bear_loc.top < wall.bottom and bear_loc.right <= wall.left and bear_loc.right + 10 > wall.left: pass
    # otherwise, move right
    else: bear_loc = bear_loc.move([10, 0])

if keys[pygame.K_UP]:

    # Upward movement occurs UNLESS...
    # player is within x-range of wall...........................and player is below wall........and player will collide with wall
    if bear_loc.right > wall.left and bear_loc.left < wall.right and bear_loc.top >= wall.bottom and bear_loc.top - 10 < wall.bottom: pass
    # otherwise, move up
    else: bear_loc = bear_loc.move([0, -10])

if keys[pygame.K_DOWN]:

    # Downward movement occurs UNLESS...
    # player is within x-range of wall...........................and player is above wall........and player will collide with wall
    if bear_loc.right > wall.left and bear_loc.left < wall.right and bear_loc.bottom <= wall.top and bear_loc.bottom + 10 > wall.top: pass
    # otherwise, move down
    else: bear_loc = bear_loc.move([0, 10])
After the event listeners, the wall must also be drawn:
# draw wall
pygame.draw.rect(screen, (154, 146, 173), wall)
Create an object to interact with (a tree):
# surface and rectangle for interactive object
tree_surf = pygame.image.load('intro_to_pygame_images/tree.png').convert_alpha()
tree_loc = tree_surf.get_rect(center = (400,400))
Create flags (boolean variables) that check the status of the interaction. This will prevent repetition of text later on:
# flag for whether the tree has been interacted with - If True, the text will appear when the player collides with the tree
play_collision_text = True

# flag for whether the user has responded yet - If True, the user has not responded yet
accept_response = True
In the event loop, create a flag that is True when the player collides with the tree:
# flag for collision with tree - True if a collision is occurring
collide_tree = pygame.Rect.colliderect(bear_loc, tree_loc)
Print some text when the player collides with the tree. Set play_collision_text to False so that the message will only print once:
# collision with tree
if collide_tree and play_collision_text:
    # prevent text from repeating
    play_collision_text = False
    print("There is a tall tree... with something at the top!")
    print("Climb tree? Yes [y] or No [n]: ")
Use an event listener to accept the player's responses.
The player has the option to climb the tree ("y" key) or not ("n" key). If the player chooses not to climb the tree, they should be able to change their decision later. Therefore, we should accept the player's responses until the "Yes" option has been fulfilled. When this happens, accept_reponse will be set to False.
The event listener should only work if:
- the tree has been interacted with:
play_collision_text = False - the player has not yet climbed the tree (clicked the "y" key):
accept_response = True
# once the tree has been interacted with, accept responses and prevent interaction from repeating
if event.type == KEYDOWN and not play_collision_text and accept_response:
    if event.key == K_y:
        print("y")
        print("You climb to the top and find a KEY.")
        accept_response = False
    elif event.key == K_n:
        print("n")
        print("It looks too tall to climb anyway.")
At the end of the event loop, the tree should be added to the screen:
# add tree image to screen
screen.blit(tree_surf, tree_loc)
# get list of available system fonts
fonts = pygame.font.get_fonts()
for f in fonts:
   print(f)
Create a Font object with a font and size:
# font = "lucidaconsole", size = 14-point
font = pygame.font.SysFont("lucidaconsole", 14)
Inside the event loop, draw the text onto a new Surface using Font.render(text, antialias, color, background). The antialias argument smoothes out the letters if True, so if a pixelated font is desired, set antialias=False. Note that this function can only render one line of text at a time.
# apply the text to a surface; make the text smooth and in red on a white background
text = "Have a nice day"
text_surf = font.render(text, True, "red", "white")
In the same way an image can be added to the screen, use Surface.blit() to make the text appear in the game window:
# make the text appear on the screen with the top left corner located at x=100, y=200
screen.blit(text_surf, (100,200))
def write_lines(display_surface: pygame.Surface, lines: list[str], x: int, y: int, increment: int, colour: str="black"):
    """
    Draws lines of text on the display surface. The top left corner of the first line of text
    begins at position (x,y) and the y-value increases by the increment for each line.

    Parameters:
    - display_surface (pygame.Surface): surface to display text on
    - lines (list[str]): text to add to screen
    - x (int): x-value of the top left corner of the first line of text
    - y (int): y-value of the top left corner of the first line of text
    - increment (int): number of pixels the y-value will increase by for each consecutive line
    - colour (str): colour of text

    Returns: None
    """

    for line in lines:
        text_surf = font.render(line, True, colour)
        display_surface.blit(text_surf, (x,y))
        y += increment
Note that the increment should always be larger than the height of the font to prevent lines of text from overlapping.
Going Forward
Feeling confident in your pygame skills? Why not add characters into the game that can talk to the player through the power of AI! Check out the Pygame with AI tutorial here.
References and Companion Files
References:
- The Pygame Getting Started Wiki: https://www.pygame.org/wiki/GettingStarted
- Education at Bat: Seven Principles for Educators: https://www.gse.harvard.edu/news/uk/09/01/education-bat-seven-principles-educators
- Create a Simple Video Game with Pygame - Step by Step Tutorial for Python Beginners! by Python Simplified on YouTube: https://www.youtube.com/watch?v=W-QOtdD3qx4
Companion Files:
- Public Repository: Intro-to-Pygame-and-AI
- A simple pygame example: simple_pygame.py
- Video game playthrough (may require downloading): simple_pygame_playthrough.mp4
- Pygame with AI tutorial: Pygame with AI: Using language models in a pygame-based video game!