CodeCraft: Immersive Web Development with Python and JavaScript involving 3D Objects and Animations
A guide to creating a web application combining Streamlit and Three.js for visualizing 3D objects and animations


- Objective:
- Brief Introduction
- Getting Started with Streamlit
- Getting Started with Three.js: Creating Interactive 3D Web Experiences
- Integration of Streamlit With HTML
- Conclusion
- Resources
Objective:
The objective of this document is to provide comprehensive knowledge and essential methodologies for creating an interactive web platform that allows users to actively engage with 3D objexts and animations within a web page. The discussion will focus on the utilization and manipulation of front-end web development Python library Streamlit and its components. Additionally, for 3D objects and animation integration, the basics of the cross-browser JavaScript library Three.js and HTML will also be explored and explained.
Brief Introduction
How often do you use a website? Probably, regularly or very often. Secondly, Have you ever thought about the programming and the algorithms that make them work? Behind every well-functioning website, there is a team of developers who write code in languages like HTML, Python,JavaScript and more. These languages define the structure, appearance, and interactivity of web pages.
In this blog we will learn the ways to design an interactive website using Python Library such as Streamlit and for 3D objects integrarion, we will explore the basics of the cross-browser JavaScript library Three.js and HTML.
Getting Started with Streamlit
What is Streamlit?
Streamlit is a open-source Python library that makes it easy to create web applications for machine learning and data science projects. Streamlit takes care of all the web development backend, allowing you to focus on building your application's functionality and visualizations.The backend refers to the server-side components of a web application. It involves the programming and implementation of the server logic, database operations, and other server side functionalities.
Creating a Basic Layout of a Website Using Streamlit
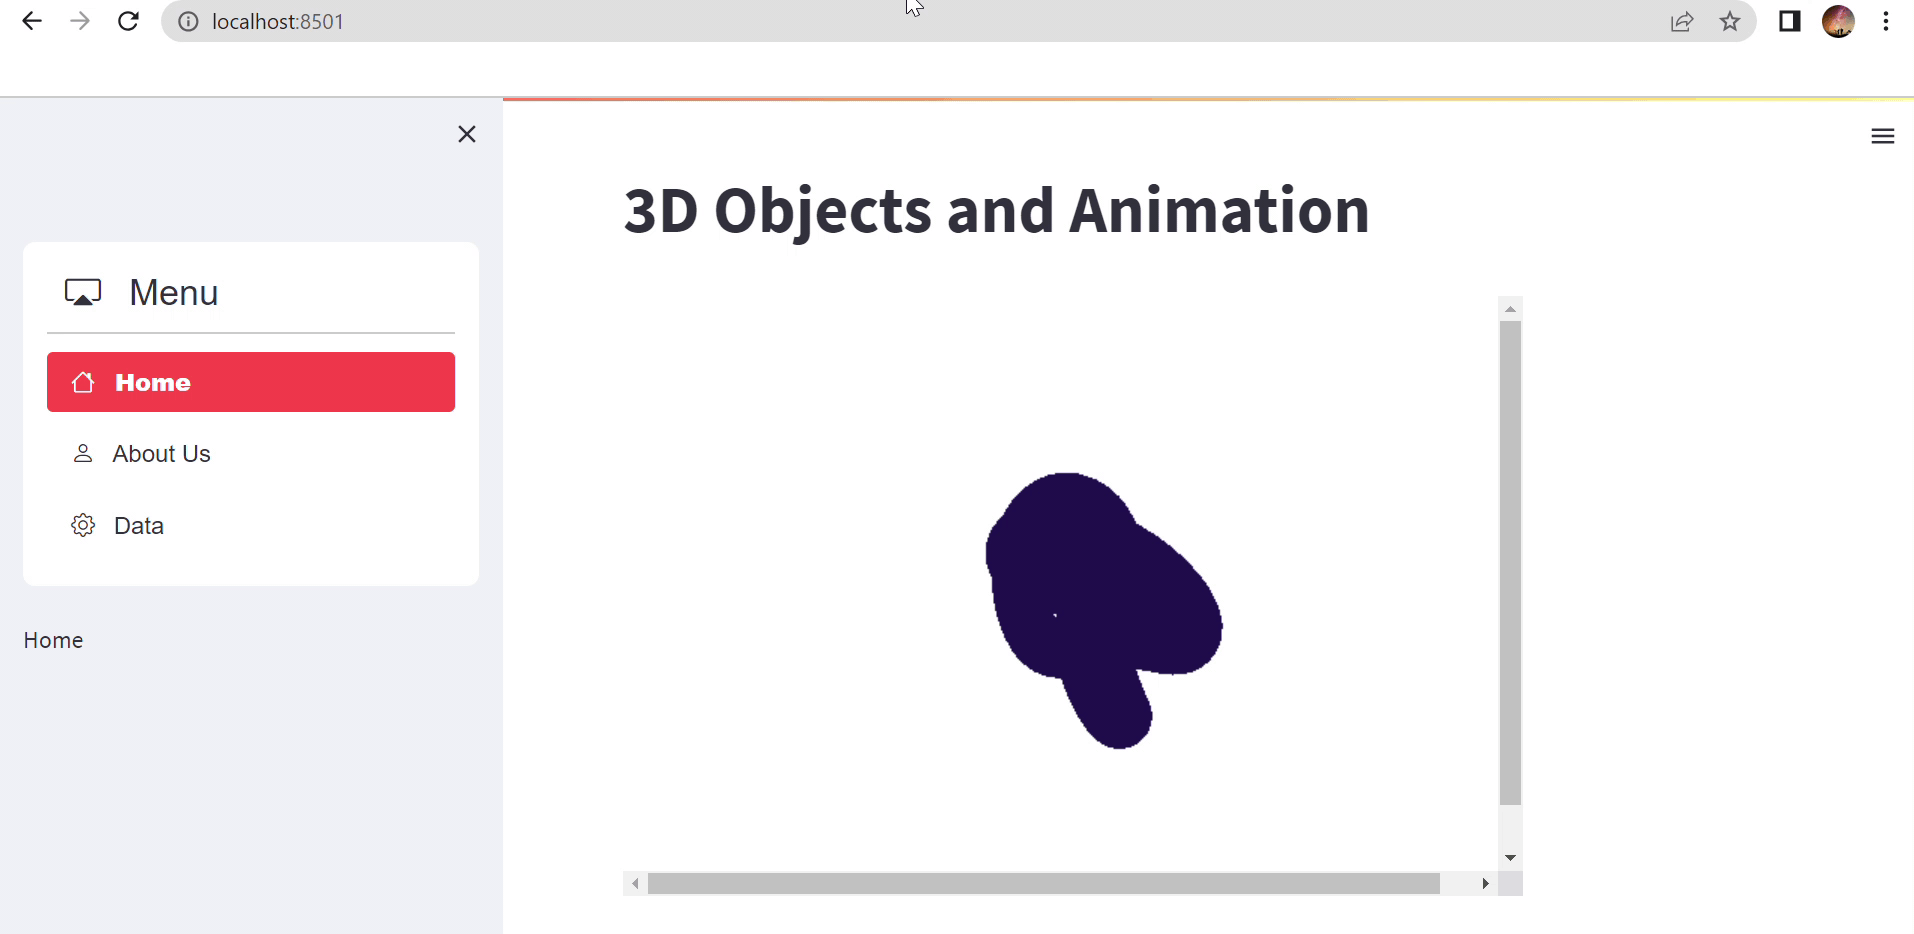
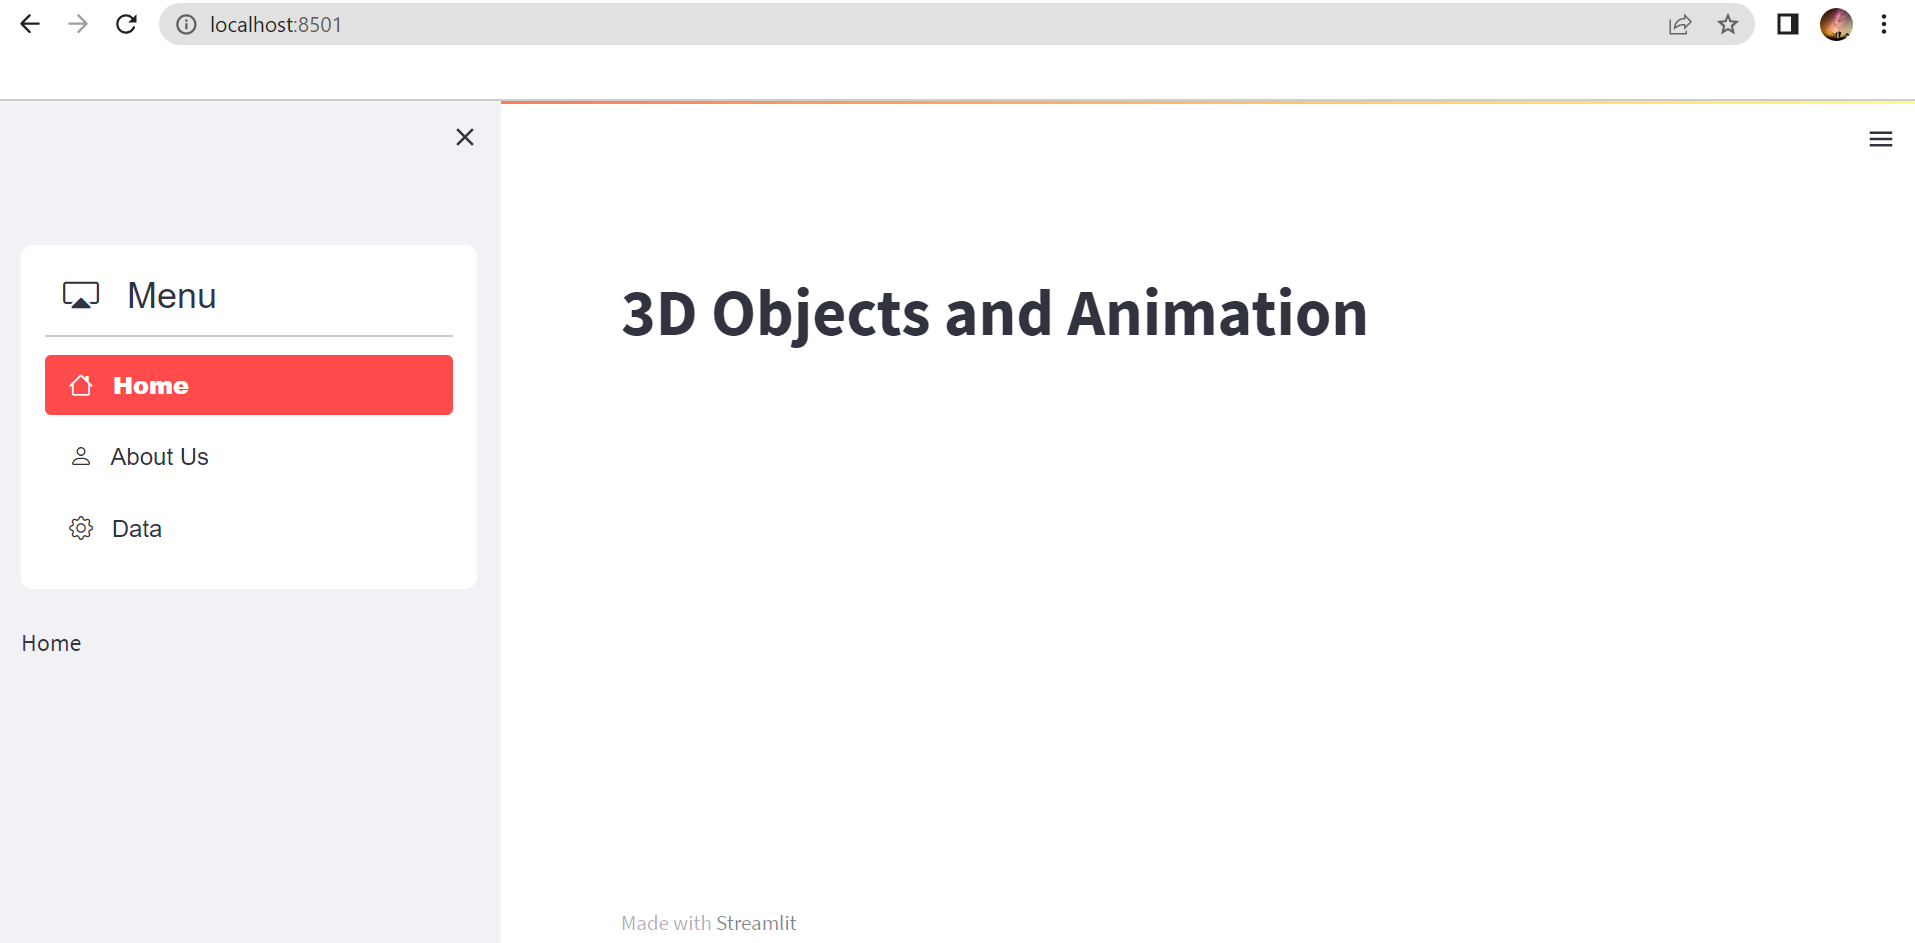 The code demonstrates the creation of a basic layout for a web page as in the image above using Streamlit. Let's break down the code and explain its functionality:
First of all, we import the necessary libraries for the code. streamlit is the main library for building the web page, and streamlit_option_menu is an additional library that provides enhanced menu options.
The code demonstrates the creation of a basic layout for a web page as in the image above using Streamlit. Let's break down the code and explain its functionality:
First of all, we import the necessary libraries for the code. streamlit is the main library for building the web page, and streamlit_option_menu is an additional library that provides enhanced menu options.
import streamlit as st
from streamlit_option_menu import option_menu
With st.set_page_config(), we set the title of the web page to "MY WEBSITE" and specify the layout as 'wide'. Using layout='wide' expands the content area to utilize more horizontal space, resulting in a wider layout.
st.set_page_config(page_title='MY WEBSITE', layout='wide')
We use st.sidebar to create a sidebar for user interaction. Within the sidebar, we utilize the option_menu function from the streamlit_option_menu library. This function allows us to create a menu with multiple options. In this example, the menu options are "Home", "About Us", and "Data". We can also specify icons for each option, such as 'house', 'person', and 'gear'. The menu_icon parameter sets the icon for the entire menu, and default_index determines the initial selection. The orientation parameter is set to 'vertical' to arrange the menu options vertically.
with st.sidebar:
    selected = option_menu("Menu", ["Home", "About Us", 'Data'],
                           icons=['house', 'person', 'gear'], menu_icon="cast", default_index=1, orientation='vertical')
    selected
In the main content area, we check the value of the variable 'selected' to determine which content to display. If the selected option is "Home", we use st.title() to display the title "3D Object and Animation".
if selected == "Home":
    st.title('3D Objects and Animation')
Getting Started with Three.js: Creating Interactive 3D Web Experiences
What is Three.js?
Three.js is a JavaScript Library that provides a high-level interface for creating and manipulating 3D objects. It simplifies the process of rendering 3D graphics in web browsers and makes it accessible to developers with varying levels of experience.
Setting up Three.js:
To begin using Three.js, you can include the library in your project by either downloading the script or using a content delivery network (CDN). Simply add the < script > tag to your HTML file, and you are ready to go. Three.js is designed to work well with other programming languages and frameworks, allowing you to integrate it seamlessly into your existing projects.
<script src="https://cdnjs.cloudflare.com/ajax/libs/three.js/r128/three.min.js"></script>
Creating 3D Animated Objects for a Web-page
Example Web-page with 3D Objects:
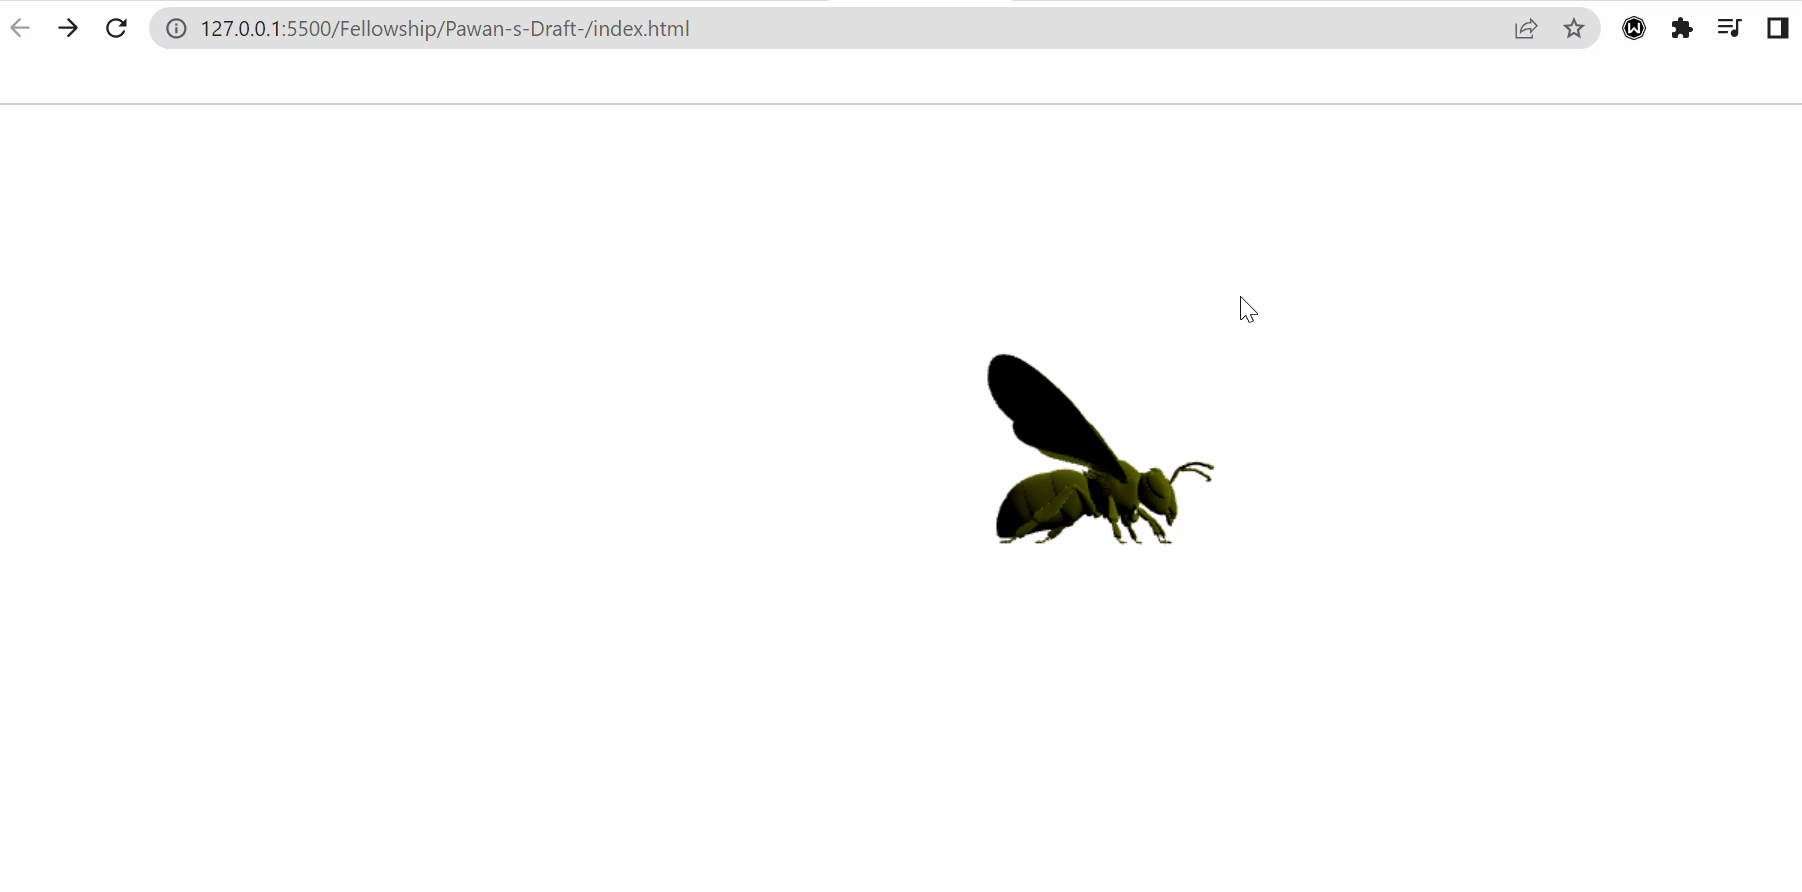
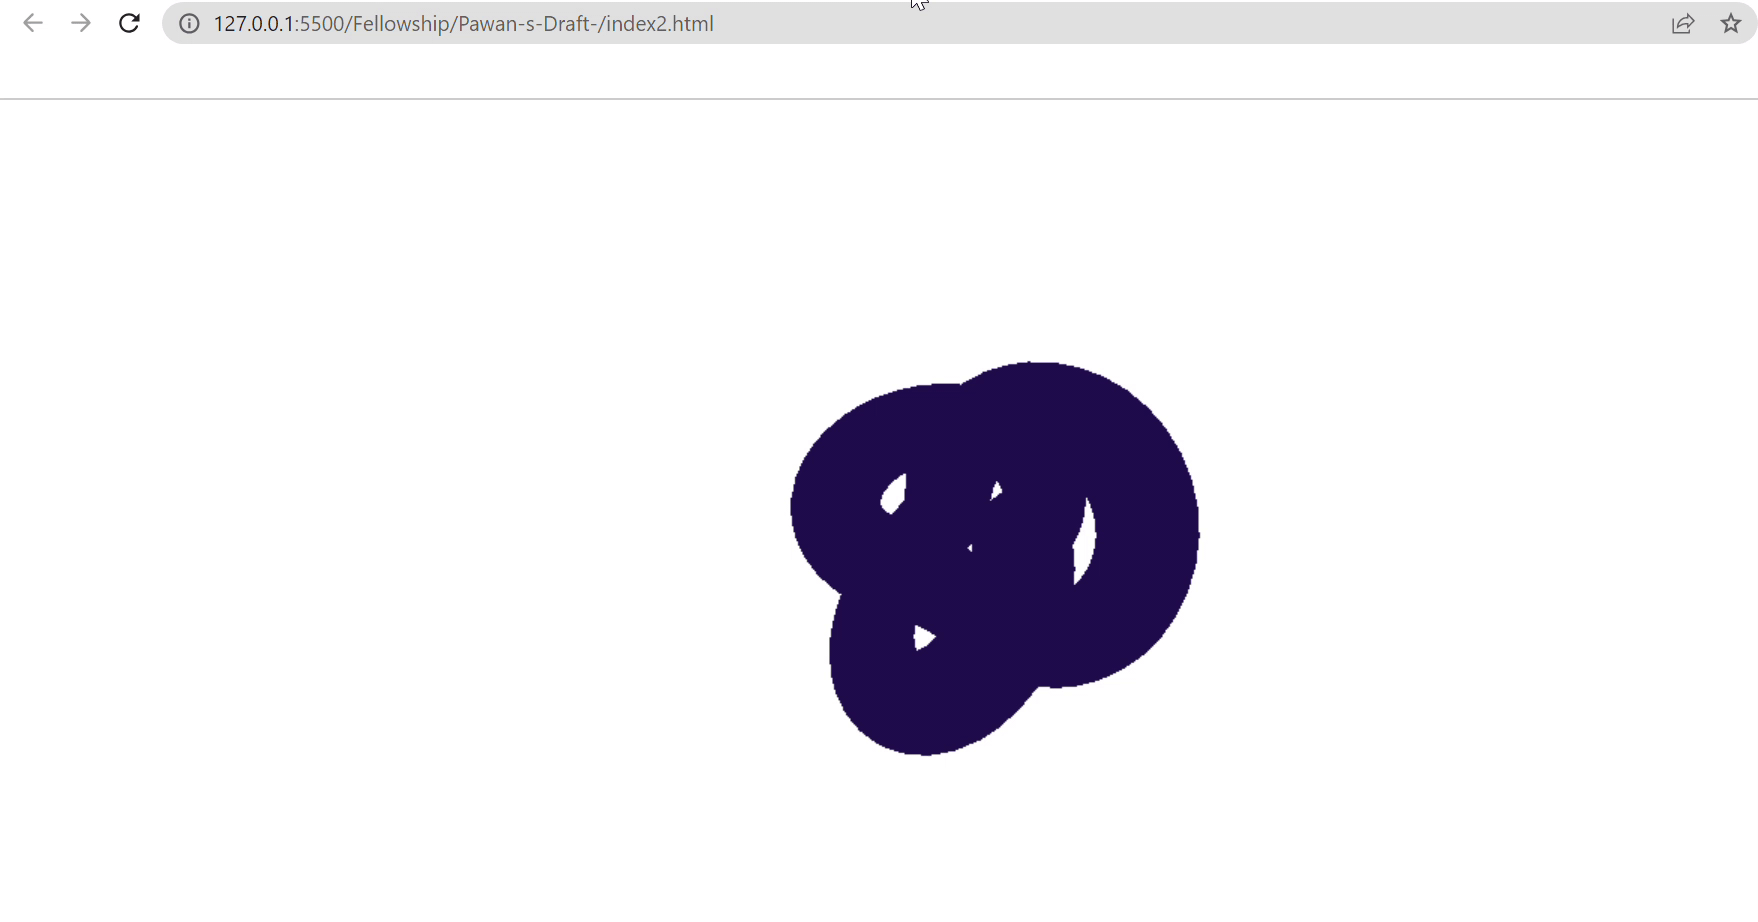
The first example involves the use of in-built Three.js geometric primitive model: Torus knot. The second example depicts the use of external 3D graphic resource for complex structural design. We begin with the HTML code and set the title of the web page to "3D Objects and Animation".
<!DOCTYPE html>
<html>
<head>
    <title>3D Objects and Animation</title>
</head>
Now, for the main 3D design and animation component of the code we add < script> tag with the URL - "https://cdnjs.cloudflare.com/ajax/libs/three.js/r128/three.min.js" to download/connect with the Three.js library online. Similarly, we also add the URL - "https://cdn.jsdelivr.net/npm/three/examples/js/loaders/GLTFLoader.js" to allow Glb file (3D models) to be used as our first-hand static 3D graphic resource for our webpage. GLB (GLTF Binary) and GLTF (GL Transmission Format) are file formats used for 3D asset delivery and rendering in real-time applications. Common uses for glTF/Glb files include VR, AR, games, native web apps, and 3D ads. Other file extension such as FBX can also be used, but the URL inserted should be changed accordingly. However, GLTFLoader are most widely used as it is easy to work with.
Let's dive into some of the key methods and concepts in Three.js in more detail. The library offers a wide range of features and capabilities for creating complex and interactive 3D scenes. As of now, we will only discuss some of the fundamental methods and concepts in Three.js.
1. Scene, Camera, and Renderer
In Three.js, the scene, camera, and renderer form the core components for creating and rendering a 3D scene.
Scene: The THREE.Scene class represents the 3D scene or environment where all objects, lights, and cameras are placed. You can add objects to the scene using the scene.add(object) method.
Camera: The camera determines the perspective and view of the scene. Three.js provides various camera types, such as THREE.PerspectiveCamera and THREE.OrthographicCamera. The camera's position and orientation define what is visible in the scene.
Renderer: The renderer, typically THREE.WebGLRenderer, is responsible for drawing the 3D scene on the web page. It takes the scene and camera as inputs and renders them using WebGL, a graphics API that provides hardware-accelerated rendering capabilities in modern web browsers. The renderer also handles aspects like anti-aliasing, sizing, and background color.
In the code scene, Camera and Renderer as set up as follows:
// Set up the scene, camera, and renderer
var scene = new THREE.Scene();
var camera = new THREE.PerspectiveCamera(75, window.innerWidth / window.innerHeight, 0.1, 1000);
var renderer = new THREE.WebGLRenderer({ antialias: true });
renderer.setSize(window.innerWidth, window.innerHeight);
renderer.setClearColor(0xffffff); // Set background color to white
document.body.appendChild(renderer.domElement);
The THREE.Scene() class is used to create a new scene where all objects, lights, and cameras will be placed.
The THREE.PerspectiveCamera() class is used to create a camera with a perspective projection. The parameters are the field of view, aspect ratio, near and far clipping planes.
The THREE.WebGLRenderer() class is used to create a renderer that will draw the scene using WebGL. The antialias option is set to true to enable antialiasing.
The setSize() method sets the size of the renderer to match the window's inner width and height.
The setClearColor() method sets the background color of the scene to white.
Finally, the renderer's DOM element is appended to the document body.
2. Objects and Models
In Three.js, objects represent the entities rendered in the scene. There are various object types available, such as geometric primitives (THREE.BoxGeometry, THREE.SphereGeometry), meshes (THREE.Mesh), and more complex models loaded from external files.
Geometric Primitives: Three.js provides several built-in geometric primitives, which are defined by their geometry and material. You can create objects like boxes, spheres, cones, and cylinders using these primitives. Geometric primitives are created with a THREE.Geometry class or using the shortcut THREE.BoxGeometry, THREE.SphereGeometry, etc.
Mesh: A mesh combines geometry (shape) and material (appearance) to create a renderable object. The THREE.Mesh class is used to create a mesh. You can assign different materials to a mesh, apply textures, and manipulate its position, rotation, and scale.
Loading External Models: Three.js supports loading 3D models from external files, such as .obj, .gltf, or .fbx formats. The library provides loaders like THREE.OBJLoader, THREE.GLTFLoader, and THREE.FBXLoader to load models. These loaders asynchronously load the model files and provide access to the loaded object.
// Create a torus knot
const geometry = new THREE.TorusKnotGeometry(1, 0.4, 128, 32);
const material = new THREE.MeshBasicMaterial({ color: 0x20124D, transparent: true, opacity: 1 }); // Set material to be transparent
const torusKnot = new THREE.Mesh(geometry, material);
scene.add(torusKnot);
A torus knot geometry is created using THREE.TorusKnotGeometry(), specifying parameters for the radius, tube diameter, tubular segments, and radial segments. The resulting geometry is assigned to the geometry variable.
A material is created using THREE.MeshBasicMaterial() with a specified color (0x20124D) and transparency settings (transparent: true, opacity: 1). The material is assigned to the material variable.
A mesh is created by combining the torus knot geometry with the material using THREE.Mesh(). The resulting mesh is assigned to the torusKnot variable and added to the scene using scene.add().
// Load the bee model
var loader = new THREE.GLTFLoader();
loader.load('Bee.glb', function (gltf) {
    var bee = gltf.scene;
    scene.add(bee);
    // Set initial position and scale of the bee
    bee.position.set(0, 0, 0);
    bee.scale.set(0.1, 0.1, 0.1);
// Traverse the model hierarchy to modify materials
    bee.traverse(function (child) {
        if (child.isMesh) {
            // Apply color to the materials
            child.material.color.set(0xffff00); // Set the color to yellow
        }
    });
});
The THREE.GLTFLoader() class is used to load a glTF file containing the bee model.
The load() method is called with the path to the glTF file and a callback function that receives the loaded model (gltf).
The bee model is accessed from gltf.scene and added to the scene using scene.add().
The position and scale of the bee model are set using bee.position.set() and bee.scale.set().
The traverse() method is used to traverse the hierarchy of the model and modify its materials. The callback function is called for each child object, and if it is a mesh (child.isMesh), its material color is set to yellow.
3. Lights
Lighting is crucial for creating realistic 3D scenes in Three.js. Different types of lights can be added to the scene to illuminate the objects.
Ambient Light: The THREE.AmbientLight class represents a light source that illuminates all objects equally. It simulates global illumination and provides overall ambient lighting to the scene.
Directional Light: The THREE.DirectionalLight class simulates a distant light source, like the sun. It has a position but emits light in a specific direction, casting shadows and providing directional illumination.
Point Light: The THREE.PointLight class represents a light source that emits light in all directions from a single point in space. It is used to simulate localized light sources, such as lamps or bulbs.
Ambient Light and point light are added in our second example of an animated bee to provide realistic texture to it.
// Add ambient light
var ambientLight = new THREE.AmbientLight(0xffffff, 0.5);
scene.add(ambientLight);
// Add a point light
var pointLight = new THREE.PointLight(0xffffff, 1);
pointLight.position.set(5, 5, 5);
scene.add(pointLight);
The THREE.AmbientLight() class is used to create an ambient light with white color (0xffffff) and intensity of 0.5. The ambient light provides overall lighting to the scene.
The THREE.PointLight() class is used to create a point light with white color and intensity of 1. The position of the point light is set using pointLight.position.set().
4. Animation
Animation brings life and interactivity to the 3D scene. Three.js provides a built-in animation loop and several methods to animate objects in the scene.
Animation Loop: The requestAnimationFrame() function is used to create an animation loop in Three.js. It repeatedly calls a function to update and render the scene, ensuring a smooth animation effect.
Object Transformations: Three.js provides methods to manipulate an object's position, rotation, and scale over time. By modifying these properties inside the animation loop, you can create dynamic movements, rotations, and scaling effects.
Keyframe Animation: Three.js also supports keyframe animation, where you define specific positions, rotations, or other properties at different points in time (keyframes). The THREE.AnimationMixer class manages keyframe animations for objects.
// Animate the torus knot
function animate() {
    requestAnimationFrame(animate);
    torusKnot.rotation.x += 0.01;
    torusKnot.rotation.y += 0.01;
    renderer.render(scene, camera);
}
A function named animate() is defined to handle the animation loop. It uses requestAnimationFrame() to schedule the next frame and increments the rotation of the torus knot in the x and y axes. Finally, it renders the scene with the updated rotation using renderer.render().
// Set initial camera position
camera.position.z = 5;
// Animation loop
function animate() {
    requestAnimationFrame(animate);
    // Rotate the bee
    if (scene.children.length > 2) {
        var bee = scene.children[2];
        bee.rotation.y += 0.01;
    }
    // Oscillate the bee's position vertically
    if (bee) {
        bee.position.y = Math.sin(Date.now() * 0.001) * 0.2; // Adjust the amplitude and speed as desired
    }
    // Transalte the bee
    if (bee) {
        bee.position.x += 0.01;
        if (bee.position.x > 2) {
            bee.position.x = -2;
        }
    }
    renderer.render(scene, camera);
}
animate();
The requestAnimationFrame() function is used to create an animation loop by recursively calling the animate() function.
Inside the animation loop:
The bee model's rotation is incremented to create a rotating effect.
The bee's position is modified to oscillate vertically based on the current time (Date.now()) and a scaling factor.
The bee's position is also translated horizontally, and if it goes beyond a certain limit, it wraps around to the other side.
Finally, the scene is rendered using renderer.render().
Integration of Streamlit With HTML
Streamlit.Components.V1
Streamlit.Components.V1 is a module within the Streamlit library that allows us to create custom components for your Streamlit applications. It basically, provides a way to extend the functionality of Streamlit beyond the built-in features by leveraging JavaScript, HTML and CSS.
By using 'streamlit.components.v1' we can write custom code in JavaScript and HTML to create interactive and dynamic elements that integrate seamlessly with the Streamlit application. This feature opens up a wide range of possiblities of creating specialized visualizations, custom input widgets integrating external JavaScript libraries into our Streamlit applications.
Above, we learnt the methods and created webpage layout and 3D web-content as two different code snippet. We will be creating a function to integrate these two codes to generate a single web-page.
We start with importing necessary code dependencies : html from streamlit.components.v1, and codecs. The design_3d function is then defined, which takes the path to an HTML file (design_html) as input and renders the HTML content using the html function from Streamlit's components.v1 module.
from streamlit.components.v1 import html
import codecs
def design_3d(design_html, width = 600, height= 400):
    d_file = codecs.open(design_html,'r')
    page = d_file.read()
    html(page, width = width, height = height, scrolling = False)
The function begins by opening the HTML file specified by the design_html parameter using the codecs.open method. It reads the content of the file and assigns it to the page variable.
The function uses the stc.html function from the streamlit.components.v1 module to embed the HTML content into the Streamlit app. The stc.html function takes the following parameters:
page (string): The HTML content to be embedded.
width (int): The width of the embedded HTML content in pixels.
height (int): The height of the embedded HTML content in pixels.
scrolling (boolean, optional): Specifies whether to enable scrolling within the embedded HTML content. Defaults to False, disabling scrolling.
The full operational code is also provided below:
import streamlit as st
from streamlit_option_menu import option_menu
from streamlit.components.v1 import html
import codecs

def design_3d(design_html, width = 600, height= 400):
    d_file = codecs.open(design_html,'r')
    page = d_file.read()
    html(page, width = width, height = height, scrolling = True)


st.set_page_config(page_title='MY WEBSITE', layout='wide')

# Create a sidebar
with st.sidebar:    #Creates a sidebar for User-Interaction
    selected = option_menu("Menu", ["Home","About Us", 'Data'], #set options and add icons to the menu bar
    icons=['house','person', 'gear'], menu_icon="cast", default_index=1,orientation= 'vertical')
    selected

# Create the main content area
if selected == "Home":
    st.title('3D Objects and Animation')
    design_3d('index2.html')
Conclusion
The blog-post, introduced the exciting world of immersive web development with Python, Streamlit, HTML and Three.js. Readers are encouraged to explore various 3D designs from the internet and experiment with the concepts and techniques discussed here. Embracing this approach fosters a deeper understanding of immersive web development and empowers students to deliver captivating and visually stunning web experiences.
Resources
Discover three.js, 1 Oct. 2018, .
Streamlit. GitHub - Streamlit/Streamlit: Streamlit — a Faster Way to Build and Share Data Apps.
Components API. Streamlit Docs.